Hobby Pages

Wednesday, 30 September 2009

Queue Jumping GI's -They made me do it Sarge!

Well I just had to do it. I so was beefed up to the hilt with plastic American Infantry figures and painting guides galore. If I didn't have a go I'd burst. A fast forward to the results of my first GI figure painting experimentation session being:


But how did I get there (and what about those metal Moria Goblins)?

The final  nail in the coffin of restraint and dignity was the 'impulse buy' of (ha ha, he laughs but unbeknownst to him, deep down in his sub-conscious his hobby mind had been planning this purchase for a long, long while ) the Flames of War packaged Vallejo"US Paint Set". This was despite not owning the prerequisite "Quarter Master Set" - I figured there were plenty of near matches available from my GW, Tamiya, Humbrol Acrylics (this latter one is a really old set, but I see they are back out on the market, as advertised on the Valiant web-site) and the very reasonably priced, aka cheap and lots of it, Anita's Acrylics. Yes, great just what I needed another dilemma, yet another confusingly complicated paint system. I didn't realize there quite so many different shades and colours (or should I say interpretations) of Khaki across the paint manufacturers :(

In the back of my mind I was also conscious of Arquinsiel's previous comment regarding Vallejo colours not quite matching the guide 100% so I wanted a firm test of what they could do before inevitably buying wholesale into it. Nevertheless the Valiant US GI's were squarely fixed in my sights and I was 'as curious as a cat' to see if Al's comment on their size viz other painted figures (which I knew would be smaller) would made me run screaming away. Those interested may note an old painted Revell US Ardennes infantryman sitting atop the Yellow Tamiya paint pot in the background of the first picture, double-click in for details.(Also note while in the hobby shop I also picked up - no I couldn't stop myself,  a new set of Italeri US Infantry. The lure of "new toolings" proudly marketed on the front of the box quickly claimed another victim. Not so their repackaged old Esci ones, despite the their noticeably harder plastic than I remember as a kid, I managed to put them back on the shelf). Don't forget I also possess a stash (150+) of unpainted late war Revell American (Ardennes) Infantry which means the US paint set won't run out of subject matter any time soon.

Enough of the preamble, what did I do? First of all I washed them in detergent like a good boy, then cutting them carefully off the sprue convinced me that I did not need the dreaded PVA coat, the plastic is really solid. Which is an A+ benefit in my eyes. Yes, they do look large next to other manufacturers1/72 scale infantry (again you'll see a Revell chap in  the first picture), but not enough to put the likes of me off. However I would only battalion Valiant kit together with like Valiant kit, but I see that as a fine way of distinguishing between OoB units on tabletop. I guess I am shameless as I am happy with these giants fighting beside midgets.


The undercoat was Choas Black from GW and this gave a very good seal to the figure. (Note Fraximus and Paul both recommend Halford's car paint primer so I will have to check this out, but I am in experimental mode and just used what was at hand). I do like GW Chaos black as it always feels to me more of a thin plastic skin than just a flaky surface covering, but this is expensive when you consider it is basically an undercoat that is immediately hidden. A deep intake of breath and turn to the Vallejo paints and Flames of War, Valient and Italeri painting charts. Nothing quite like getting conflicting advice, plus the artistic impressions gleaned from my Uniforms of World War II book! Meanwhile ... the Vallejo paint went on lovely :)

True the Vallejo paints needed a real good shake before I got the true colour, but the end result was good, in that for the first time I really was happy with the way the US infantry looked. I have to say I am now a very big fan of Valiant infantry, big figures or no.They paint as easy as Games Workshop starter plastics and I think that is a huge compliment.Experimentation to follow is how to highlight and shade, but for now I am happy.

Note: Any comments/tips on photographing 1/72 infantry figures appreciated, as I find it a complete pain :(

PS : Just don't mention the Goblins (on the painting tray) as I can see they are upset. I 'will' (eventually) finish that HoTT army :(

Tuesday, 29 September 2009

"Brown" and "Green" Tigers

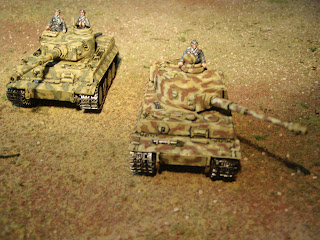
Following hot on the heels of 1/72 Hasagawa "Green Tiger" painting saga comes the 1/76 Fujimi "Brown Tiger" in what I can only say was a comparatively speedy paint job but also giving it a very Eastern Front effect. In the staged scene below we can see "Brown Tiger" to the back halted, covering "Green Tigers" advance:


Note in the background the huge vastness of the Russian Steppes leading off over the horizon. Then note, somewhat spoiling this illusion, top left and the shadow of my window sill. Obviously expecting danger "Green Tiger" halts and now covers "Brown Tiger" as it advances. You will have to excuse my vivid imagination here as I have been painting (or just looking at) these beasts for far too long.


You may also notice that "Green Tiger" looks a little lighter in parts of its base Dark Yellow from previous photographs, I retrofitted lessons from "Brown Tiger's" painting. I am happy with "Green Tiger" now :)

Am I done with German heavy tanks? I must admit I am tiring, but I do have a pair of Airfix Tigers still to do. Yes, this would make-up a heavy (reinforced) German heavy tank company, however the Airfix kits do have a serious flaw. They require a bit of modeling as infamously as the kit designers studied a version that had been reconstructed from an abandoned Tiger (from Tunisia) at a tank museum. The Allies in their haste to fathom the secrets of the Tiger took it apart but broke it (so urban myth has it) and things like stowage bins to the rear of the turret were forgotten about as they tried in vain to get the engine started. Along came the Airfix designers, studied what they though was the real deal and didn't see the difference with war time photographs until the molds had been pressed. I intend to do a job like Tim Marshal (first photo on page, bottom right) did on his, but the plasti-card can wait for a while ;)

Monday, 28 September 2009

And now for something completely different: Renaissance 28mm

It is amazing what you find when looking through a stack of old biscuit tins. While looking for some lost WWII kit (I know I do have it somewhere) I found an old army [or should I say an ongoing army project] of interest. Aside from the fascination of the twentieth century I am as eclectic in my periods of interest (2000 BCE to 2000+ CE) as I am in the scales of miniatures I collect.

This is a by-product of a very 'avant garde' wargames club I was of member of down in London, which made people play outside their known periods (or comfort zones) at their weekly communal all-members-involved meetings. So skulking off to do your favourite thing with a friend in the corner was a no-no in this London club at least. So here is a success story of an old painting project (and ongoing DBR army building project). Technically sold as 28mm Fantasy from Games Workshop but when I saw them they were 28mm Renaissance from Games Workshop (yes the non-magical Empire Troops).The old GW molds meet this description much better than the newer far more fantastical ones.

A line of Skirmish Troops shield the advancing Pike Block from distractions:


An eagles view of the Pike Block advancing:


Angry men of the Pike Block vent and fume:


A "sleave" of Shot taking aim (probably at their own skirmishers):


I really enjoyed experimenting ("no holds barred" so to speak) with the wide variety of colours in the Citadel (Games Workshop) paint system, using their shade-base-highlight system (almost painting by numbers for beginners). The fact that these Fantasy figures looked as if they had walked straight out of the sixteenth or seventeenth century, the colourful costumes of the period and compatibility with other metal manufacturers made it a no quibble army choice "Landschnects", basing as per DBR as opposed to singleton scheme of  Warhammer.

Those of an eagle eye will see not only plastics but a few metal Great Swords lurking in the back rank of the Pike Block as well as a couple of unusual characters also "filling space" in the back rank. Namely the 'Wargames Illustrated' giveaways of Friar Tuck and a non-mounted (and clothed) Lady Guinevere. This 'pike section' done is barely a quarter of the foot troops for the full army. I have most of the pike in an unpainted state awaiting my painters inspiration to start itching but as yet have not even collected the bare lead needed for the Pistols and Light Horse of the mounted "wings". Wargames Foundry being the manufacturer of choice for the remaining pikemen and handgunners. Advice and recommendations on manufacturers for the mounted appreciated.

Sunday, 27 September 2009

Panzer Commanders

In response to my pedantic "is this the right type of yellow" paint brush fiddling (which to be honest felt very much like hard work) I was at least allowed to tart-up the "Green Tiger" crewman and commander figures. I felt obliged to go back and add a few extra details to the King Tiger commander, after all this was a piece of kit with an even bigger clout. Hence I give you Panzer 'Kurtz' Senior in the King Tiger with his Junior Panzer friends in the "Green Tiger":


I am still not completely sure about the "Green Tiger's" overall look ("You wouldn't let it lie" - Vic Reeves). In this photograph I noticed that the difference between the two yellows is quite stark. I used much more white in the late war "ambush" scheme. However the mid-war tones of Dark Yellow from all the illustrative plates that I have seen (and I try to bear in mind these are only artistic impressions not real period colour photographs) do not show the yellow quite so bleached. I may come back and tinker with another whiter highlight (of a highlight) to the "Green Tiger" later (Er, much later). If I did anything more now I fear I would just spoil it.

At least I've managed to get an "in focus" Tiger crew if you click into the above photograph, tank commander and lance corporal so to speak. I have not cracked this miniature photography lark at all as I was really trying to focus on 'Kurtz' in the King Tiger!

Saturday, 26 September 2009

Tiger, Tiger Burning Bright

Their are plenty of big beasts of the WW2 jungle that still want painting in my collection. This 1/72 scale Hasagawa Tiger proved more troublesome than I had expected. I decided to do a much simpler camouflage pattern than King Tiger and JagdPanzer IV painting frenzy I recently engaged myself in, but paradoxically I found a simpler scheme so much harder to do. Going back to a mostly base Dark Yellow canvas proved somewhat tricky to me, I was always wanting to fill the open yellow spaces in with a green or a brown.

Originally [and it eventually turned out] as per my "Panzer Colours 3" painting guide book, it was going to be base Dark Yellow with a simple Green (random thin line) disruptive pattern. However once started I seemed to stare "too long at the sun with it" as I began started painting over what I had essentially already done for little or no effect. The brush was put to one side and I decided to go sleep on it. If all else failed I could always introduce a brown line pattern to it the next day, but hang it all I was hoping to keep it simple in 1943 fashion.


Well I returned more hopeful the next day and decided to keep to the 1943 style "light disruptive" camouflage pattern (shall we say Kursk'ish). See above for the result, which I now call my "Green Tiger". I still fretted and battled with the green bits, darkening and lightening them in a rather random fashion until I had "fettled" (local term) a result I was half happy(ish) with.


Finally I took my irritation out on the two Panzerwaffe crew and tarted them up as best I could according to a uniforms book I had to hand (Uniforms of World War II by Peter Darman, Blitz Editions 1998). That took my mind off those blessed green stripes.

Do I like the result? The ultimate decision is still pending as the green lines are too distinct (is the yellow quite right? ... I am being pedantic now), but it certainly counts as wargame ready, despite the lack of decals. Sitting on the painting bench next to "Green Tiger " is the Fujimi 1/76 kit destined to become "Brown Tiger", a slight variation on the 1943 German camouflage scheme. Allied Shermans, T-34's and Cromwell's now better watch out!

Friday, 25 September 2009

Painting Tray Update

Behold (at last) the behemoth King Tigers have rolled away to strike terror into the hearts and minds of the Western or Eastern Allies alike. Or alternatively presenting a plum target of opportunity for a young Jabbo fighter-pilot (Mustang or Sturmovik) to make his name. In convoy below (a faked wargame moment):


Or deployed, ready to dominate a wargames table near you ;)


Meanwhile a further batch of German heavy armour presents its profile under the painting lights. These pair of Tigers (1/72 Hasagawa and 1/76 Fujimi [early version]) pose a slight problem for me as I will have to move away from the three tone camouflage scheme I was enjoying. Something either Dark Yellow with Green or Brown irregular lines to break up the profile. The 1943 summer look as it were.Currently they sit in the Oiled and Metallic stage ready to take their camouflage markings on:


Meanwhile up in the skies the Airfix Battle of Britain single engined fighter project continues in a stop start fashion. The Hawker Hurricane MkI stands in its shade colours as:


While the Boulton Paul Defiant (viewed broadside) is shown here. It packed a surprise rear-punch to a Hurricane profile (seen from behind), but once bitten twice shy in combat as a 12 o'clock attack was its undoing.


Last but not least a second metal Goblin, The Great Goblin King himself gets painted and the Moria Goblins HoTT Army project takes an oh so small step forward:


In the background I have almost uncontrollable urge to paint 20mm WWII plastic infantry in large industrial batches, after all in the northern hemisphere the nights are beginning to draw in.

:)

Thursday, 24 September 2009

German Late War Infantry, not quite Panzer Grenadiers

Another sample PVA primer experimental batch was carried out on the Revell opponents to the US Infantry  (see previous post) as shown below. Slightly repeating myself, the loss detail was slightly disappointing but for wargame figures they will do. Note to self: Next time, apply less PVA, watered down more.


Looking at the painting scheme it seems a little too green, not the field green-gray I was expecting. I will have to double check this. Again lots of other bare plastics of this type exist in my collection and they are a target for a factory style painting approach some approaching winter's day/night. Also shown, albeit with an early war paint scheme, is a  Esci Hanomag 251/10, though please note it does have the added (almost unique amongst my model AFV's) attraction of decals ;)

While posing the above photo I was reminded of a quibble I have with the Command Decision rules, particularly in 20mm, namely you are expected to have a Half-Track vehicle for each stand in your mechanised company. Not only is this expensive but it creates a visual problem when some twelve figures could be inside it and only two pop out of it. Scale wise there is an issue as in 20mm the half track takes up far more room than it should. In 1/300 or 1/200 it is on the same size base as that of infantry. Hence I am tempted to abstract this sort of transport from the individual stand level up to the company level. It also stops over aggressive use of Hanomags and American M3 Half Tracks being pointed machine gun facing the enemy pretending to be a light tank.

Wednesday, 23 September 2009

US Armoured Infantry

Here's one I've done previously, to use the infamous 'Blue Peter' presenter catch-all phrase. A mixed manufacturer picture of an Esci White Scott Car (OK so there are no decals, what's new there then), part of a Hasagawa M3 Half Track and some (squad of) my Revell WW2 American Ardennes infantry. These were done as a trial batch a couple of years ago.


The plan was/is to set a factory production system and "go through the lot" (and there is an awful lot of bare green plastic) in a week. They were my first attempt at the PVA pre-coat system, but suffer methinks from too much PVA covering too much detail.

The paint scheme is taken from the back of the Revell box and is now in question. These are slightly later figures than the Valiant Miniatures 1942-44 GI but I do so like Valiant's painting guide. Also, although not a fan (or rather I am ignorant of the Flames of War system) their 'all the colours you need' US painting pack looks quite an attractive option too.

The above however will remain painted as is for posterity and more importantly are wargame ready :)


Tuesday, 22 September 2009

Mad minute in a Model Shop

It was one of those days. A tease of a day. Real-life commitments puts me within sniffing distance of an area where I know there is a 'model shop'. I go on the hunt armed with just an acute sense of smell. Time is against me, to confound it all I get lost and don't find the one I am after but lo and behold I find a different one, how X-Files is this getting? However I have just minutes to take everything in. Literally a smash and grab, pay the man and get out.What did I manage to get?

Check out: Valiant Miniatures

I got the 1942-44 American GI set (20mm 1/72) and they are absolutely superb. Now a definite racing certainty to get the rest (particularly the British and early and late war Germans). Although Valiant have arranged it so that the "box" is an OrBat for a Rapid Fire infantry Battalion, you pretty much easily get a Battalion worth for other rule systems too (64 US figures, 68 in the other sets for some reason).

The other purchase was an Italeri Russian Zis-3 Anti-Tank gun (nice to have two to the pack) and a pot of Tamiya XF-60 Dark Yellow (as I seem to be running out of it).I did make a mistake though, in my haste I forgot to pick up a Revell (old Matchbox) Hanomag 251/1, hmm "fume".

PS: I have Man-Flu :(

Monday, 21 September 2009

Painting Tray Progress (KonigTiger)

Well the King Tigers are now done and dusted, ready to roam and wreak havoc on East or West Allied formations, deserving the title "heavy metal" if ever there was one. En route to mischief:


Then deployed for effect:


  • That leaves two oily Tigers to play with
  • The Battle of Britain single engine fighter project
  • And those green-skins of which I can announce to the world a second Metal Moria Goblin is painted, this time the Great Goblin King himself. Eight to go!!!
In the back of my mind I am thinking "Plastic 20mm WW2 Infantry" your time has come :)

Sunday, 20 September 2009

Looking not doing, a bit of plastic voyeurism

Instead of doing things with my hands (other than chip away, and I mean very small chips at that, at the nine remaining metal goblins which are still causing me painting angst, adding a bit of yellow primer on Nazi armour and a base shade or two of RAF camouflage on vintage Airfix kits) I have been pottering from link to link on the net, a nice waste of time.

Of modelling note I love the following eye-candy sights:
Quite inspirational :)

Likewise drilling down plundering the experiences and projects of fellow bloggers is of extreme delight and causing ideas a plenty, too many to do. Double plus good in 1984 speak!

Saturday, 19 September 2009

Releases that I am looking forward to :)

I crave the delight of seeing kits that were available from the past (i.e youth) being re-released. Up-and-coming ones I have a particular eye for are:
I found a link to a Flicker collection of the origin Matchbox box art :)

The former will complete a Desert Rat tank troop (Command Decision company) in the desert for the Eighth Army and as the alternative version (bless Matchbox) as  a close-support/light tank (primarily for its many machine guns) for the US Marines in island clearing operations. A couple of kits of the latter Hanomag is needed to complete a Panzer Grenadier company, one of which will necessitate a bit of ingenuous modeling (well just sticking a 37mm AT gun on it, but that's ingenious enough for me).
  • I seem to have missed the 1/72 Italeri (old Esci kit) for the Panther, the one they seem to be pushing is the fast snap together version :(
 Of interest I found this link to a PDF of the old Airfix Magazine ship articles including one on the Repulse.

Friday, 18 September 2009

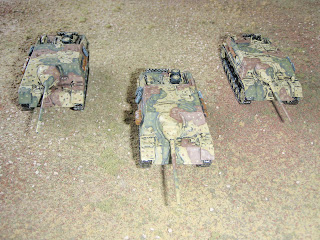
Another shot of my JagdPanzer IV's

Flicking through my camera I found this one of my initial Esci 1/72 PanzerJagd IV project and would like to post it for prosperity:


They are traveling over the very, very familiar ground to those who have seen my other photographs ;) I am still thinking that a 1944 Ardennes scenario is the most likely wargame to put on.

Thursday, 17 September 2009

Thin stripes and no spots

The Porsche turreted Royal or King Tiger stalking its Sherman prey in Normandy shortly after the D-Day landings, well at least in my mind's eye.


My 1/76 scale Fujimi Prosche turreted King Tiger is shown above (caught with the setting sun behind it,too far from the invasion beaches to make a difference). I remember the classic photograph with the Esci kit showing a King Tiger unit with mixed turret versions hiding under trees in Normandy, trying not to attract the attension of passing rocket-firing Typhoons of the RAF.


The side view is shown above (be warned the click-in photograph is fuzzy and may blur your eyes).

Instead of the full three-colour spotted "ambush" pattern I used previously I went for the slightly earlier, thinner (hence more) striped three-colour version. It also helps me tell from a distance Henschel versus Porsche on tabletop. All this means, and an audible sigh of relief follows, I am done with making and painting my King Tiger kits, Henschel or Porsche until in the distant mists of time I come back to decal them.

I can now claim a reinforced (very) heavy German tank company! As a footnote, tanks of this sort in CD3 and Battlefront etc, really distort ground scale effects. Making in the worse case tanks look "silly close" on  table. So why did I bother? I guess it was because I already had them and they was there. I should really move on now and paint something sensible and reusable on the wargames table ;)

Wednesday, 16 September 2009

B17-G starring in the 'Queen of the Skies' over the Reich

Meanwhile flying above the Reich is "Old Doodlebug" possibly heading towards those KonigTiger armaments factories. A nice (more wargame "space" friendly at least) 1/144 model of the B-17 aka the 'Queen of the Skies' from Minicraft. Admittedly any wargame would probably be centered relative to the B-17's movement, but it is feasible to fit this thing on a reasonably sized table, perhaps even in formation with a couple of supporting friends. The alternative is to start dropping down the scales to 1/300 which is less appealing from a modeling perspective.


In paiting the model itself I was experimenting with trying to get a weathered look by shading up from Games Workshop's "Boltgun Metal" as base shade, through their "Chainmail" as a mid-tone to highlighting with their "Mithril Silver" paints.


I am still debating with myself regarding the results and I am considering whether using a weak wash with Anita's Acrylic Black Metal would be better. I just don't like "shiny silver" planes but I guess some were that shiny! However I think from what I've seen on the web and books the bombers soon became war-weary in appearance.

The wargame potential for me lies with an adaptation to tabletop of the old Avalon Hill "B17 Queen of the Skies" (solo) board game I possess.

Hunting Pack of "Big German Kats"

And so I come to the final bit of painting ...

After the stripes comes a quick attack of spots, lots of yellow in the dark brown and dark green areas, then (a few) green in the base  yellow area and (again just a few) brown in the base yellow area too. This certainly breaks up the defined regions very well. Nice! The finished 1/76 Fujimi KonigTiger (with supporting band of LOTR Moria goblins in the background[eh?]) is shown below:


This means I now have a hunting pack of Big German Kats (yes "K" for Kongtiger).


This would be a company strength formation for Command Decision or Battlefront (or even Spearhead) and realistically I need no more for any feasibly historical wargame. True, I still have a model of the Porsche turret version (found in combat to be a weakness as it trapped rather than deflected some incoming enemy shots), but I file that under the category of variety not necessity. To mix in with the Henschel variants and Tigers in early D-Day+ Normandy 1944 battles for instance.

These boys are good for late 1944 in the Ardennes/Rhine and late for the 1944 and 1945 eastern front battles. However, if truth be told, the unit is great to model and look at, but a rarity on the battlefield and askew to the typical historical Order of Battle I prefer.

Fujimi KonigTiger (Henschel) get its stripes

A quick flurry of activity on the painting table resulted in the Fujimi 1/76 (Henschel) KonigTiger nearing completion, getting the following done to it:
  • First some brown stripes
  • Then some green ones
  • Then some highlighting is added to the brown stripes
  • Followed by some highlight to the green stripes
 
  • The back to highlight the base dark yellow bits that still show through
  • Finally for tonight some Games Workshop "Boltgun Metal" to highlight the tool and track
 
Now time for some coco :)
Note: Also Updated

Monday, 14 September 2009

Plastic Infantry: I know I have to go there

Now that I've seen so much well painted 20mm plastic infantry on the web, I know I will have to do some of my own. Heck armour needs infantry support. I'll probably start with the German Infantry Revell kits as (a) I have a lot of them and (b) they are well detailed, good poses and are hard plastic. See the "Naked and the Dead" below (I'll also have to work on my small scale figure photography):


Going left to right we have in bare plastic we have two figures of each:
  • German Late War (Ardennes) Infantry
  • Summer Panzer Grenadiers (Stalingrad)
  • German Late War Assault Engineers (Ardennes and on to Berlin)
I'll have to do a little more digging on the web and particularly into other people's blogs to find out the best ways of mass production painting, as we are talking 50+ figures here. My initial thoughts concern preparation, hot soapy (detergent) water then do I take the hardened PVA route but lose some detail or keep teh detail and try and bind it under several coats of varnish (gloss then matt)?.

Any advice or info links appreciated.

Fresh paint on a Big Cat

Sticking with the KonigTigers the Fujimi (Henschel version) 1/76 got the Anita's Acrylic Metallic Black treatment. First up was the track and tools to base shade:


Then followed by an overall oily wash into those cracks and crevices with a bit of loose thin overspill where my brush took it:


Just to make it look and feel a little bit battlefield grimy! I have retrospectively fitted these images back into the earlier painting post on this blog to get a step by step progression.

Sunday, 13 September 2009

What (WW2 land) rules to follow?

Despite some twenty years of 'punctuated intensity' in the wargames hobby, dominated but not exclusive to the twentieth century (and again in particularly WW2) I have yet to find my ideal set of wargame rules.The concept of "set" can be expanded to include, scale of the models (20mm, 15mm, 1/300, 10mm, 1/200 etc.), the tactical/operational level of engagement the game would represent, the timescale of turn and the simulation versus game mechanics employed.

Yes I have lots of sets (in the purchased sense), but many have not made it to actions on the table-top. Those that keep coming to mind are defined as the "good", the "hopefull" and the "sinfull". All my own personal views of course, and in no way a criticism to those who enjoy a different way/taste to mine in the hobby.

Some "good experiences" of the ones played so far have been:
  • Spearhead (and modified versions thereof, played with 1/300 or 1/200 kit, a fairly large sized battle of three to four battalions a side can be concluded in a club-night)
  • The Command Decision Series (to be accurate mainly WW2 Command Decision Version 2 but Version 3 is in my possession and has been read, played originally with my 20mm kit although I am planning another go with this set using my 1/200 kit, provides a battalion/regiment intense slog-it-out feel to a night)
  • Hell by Daylight (participated in various excellent 20mm Skirmish level games, always fun and leaving a feeling of authenticity in the mouth)
  • Squad Leader transferred to tabletop (can work well, but mainly with those who have already played it as a board-game, it can frustrate gamers not familiar with it and the infamous Stalingrad scenarios, again with 20mm kit)
Those "hopeful" sets yet to be tasted/tested in the heat of a club battle:
  • Battlefront (of which I have high hopes to use 20mm as well as my 1/200 kit)
  • (Canadian) Great Battles of World War Two (which looks to have some great concepts, probably using 1/200 kit)
  • Crossfire (which again looks to have good concepts and works for a good many people, a good 20mm prospect, particularly inspired by these chaps Tim Marschall and Lloydian)
  • Megablitz (well a few 20mm tanks should stretch a fair way in the OoB here, a very high level way to run a battle. Not a case of where are my squads but what are my battalions doing?)
Those "hopeful" sets yet even to be purchased:
  • Nuts! (skirmish)
  • I Ain't Been Shot Mum! (Company)
  • Flames of War (although very popular something tells me I shouldn't hold my breath on this one as I keep seeing it mentioned in the "points" competition sense, though their production quality seems excellent, so popular in 15mm, but a maybe for 20mm)
Ones that suited me not, as in they have "sinned" IMHO, or failed the 'wargaming environments' in which they were played in or perhaps personalities/style involved:
  • Rapid Fire First Edition (which had a notorious nights of wanton death that sealed its doom at several clubs I have attended, artillery being a notorious talking point)
Nevertheless the search continues for that "perfect" set. Visual appeal is very important for me, hence my drift away from Command Decision 2 in 20mm as the models in some cases seemed almost touching (in extreme cases, platoons of tanks almost in hand to hand combat) and it didn't carry the realistic visual feel across to me.

However my recent 20mm painting may make me reconsider this due to its modelling appeal. :)

Painting Tray Update

Behold the latest "State of Play":


New projects line-up:

Bottom/Middle left: Airfix "Battle of Britain" single-seater fighters
  • Spitfire Mk1a (not shown but already made)
  • Hawker Hurricane Mk1 (shown base-shade painted)
  • Boulton Paul Defiant (shown undercoated and part base-shade painted - note I am going for the day-fighter variant painting scheme)
  • Gloster Gladiator (purchase to be made in the future)
Top Left: A second pair of KonigTigers
  • Fujimi 1/76 KonigTiger with a Henschel Turret
  • Fujimi 1/76 KonigTiger with a Porsche Turret
Top Middle: Those Moria Goblins
  • They just won't simple go away, but I will do them!
Bottom Middle: A pair of Tigers
  • Fujimi 1/76 Tiger
  • Hasagawa 1/72 Tiger

Saturday, 12 September 2009

Every little boy needs a Spitfire

That's my story and I'm sticking with it, so I made this one for the little boy inside me.


See above my Airfix Spitfire Mk1a. Actually made sometime earlier this year (January/Frebruary), but recently (when I was making the Brewster Buffalo) I repainted its underside (from the horrible varying shades of Games Workshop medium and light blues, "ack" I know but I was experimenting with shading) to the recommended Tamiya Sky (XF-21), or Matt Beige Green according to the Humbrol painting scheme. Of course this is totally hidden in the photographs above and below!


It was a pure joy to make and a glorious trip down memory lane to boot, as I believe this (or rather the equivalent Spitfire Mk1a Airfix kit then) was the first model I ever made some thirty five years ago. Botched together, glue everywhere, radio mast soon detached and even if painted a hideous bright bronze green gloss all over, it was simply brilliant. I was even worried about decals then and needed some help from my dad and big brothers to finish it off properly. The tail planes were definitely wonky and the propeller blades too were gone before the day was out, but it stayed in the toy box for a long, long time!

Hence what follows will be referred to as the Airfix single engine "Battle of Britain" Airfix fighter project!

PS: If I remember rightly, using the cushion seat of an armchair as a "making and painting" surface (including cutting things with a model knife), despite yesterday's newspaper being used a padding underneath, did not go down too well with the woman of the house (and still doesn't).

Friday, 11 September 2009

Over the Skies of the Reich

While searching through some IKEA storage boxes I came across these boys I had painted earlier this year or last (I think). They have a feel of my recent painting schemes anyway. A base shade then a highlight :)


The early version of the Mustang, the P51B (form the Airfix "Texas Hun Hunter"kit). Painted with Tamiya and Games Workshop "Citadel" paints.


Versus the up-gunned Me109-G (again the kit is from Airfix) with 20mm cannon in under-wing pods. Not sure about the Me109 paint scheme, it seems too Matt in retrospect, maybe a satin varnish is required. This could be partly from the Humbrol acrylics I used for the grays, they seemed a little chalky and fast drying on the brush for my liking.


Not really air combat wargaming scale, unless you have a very big table, but a nice bit of eye candy representing air assets in 20mm tabletop battle IMHO. The stands came from Games Workshop marked for "Big Flyers". I had not the heart to tell the assistant what kits they were really for so I left him with the impression it was something Elvish. He took my money anyway.

Thursday, 10 September 2009

Metal problem in Moria solved


Gotcha Mr Metal Goblin!


Stop Press: Factory batch process abandoned on the Metal Goblins. Each figure is now treated as an individual in a 'holistic' arty manner before going onto the next one, sounds almost like therapy to me. I probably needed a well earned break from painting endless batches of GW "Camo Green" and GW "Bolt Gun Metal" body parts anyway.

The individual process is far slower but with only ten metals to paint some form of forward progress can be maintained, one down, nine to go!

:)

The British and American Sherman Response

Just to prove there is more to my AFV collection than late war German heavy panzers.


As they came. Three decoys (the Airfix 1/72 Sherman) and the one that stood a chance (Matchbox Sherman Firefly 1/76) of a return kill on a German heavy. Nice to see the latter is back on the market through Revell. I will have to do the cunning Tommy paint trick (as per the Revell box art) of fore shortening the length of the 17pdr main armament with a bit of light sky blue on the underside of the barrel. Also to do is some work on the tracks to weather them down from that plastic look and naturally, the decals.


These come straight out of the wargames cupboard. I painted them over ten years ago with a ubiquitous base coat of Tamiya Olive Drab (XF-62) then highlighted it up. The rub being, for the three on the left I used Olive Drab (XF-62) with increasing amounts of Sand Yellow (XF-60), while the Sherman on the furthest right was painted at a slightly different time when I used Olive Drab (XF-62) with Yellow (XF-3) having forgot my previous recipe. Only later seeing the subtle difference!

The same Olive Drab (XF-62) with increasing amounts of Sand Yellow (XF-60) scheme was used for my American Shermans (All 1/72 Esci, although two slightly different types, the left and middle one type, the right hand one another) below:


They are begging for White Star decals and the US tank commander can do with a bit of shading and highlight.

The moral of this story: Paint all your tank troops together at the same time, even if it takes longer

:(

Wednesday, 9 September 2009

Troublemakers: The Goblins of Moria

Now the painting tray stands almost empty, quite forlorn .
Gone are the tanks and aircraft.


What is left is the evil Goblin hoard that has all but broken my will to paint them, but that is what Goblins are good at, being evil and sneaky.

The background to this madness:
It all started when I joined in a HOTT (Hoards Of The Things) Campaign down at my local wargames club. Despite my not having a 15mm army I became an Orc Chieftain (of Bogland) through a generous donation/loan by the campaign referee. The game was a blast (and is still ongoing) so I came away enthused and charged to do some HOTT fantasy figures of my own. The trouble was that I had a stack of unpainted 20mm LOTR (Lord of the Rings) figures from GW (Games Workshop) and couldn't really justify in my own mind doubling up with an equivalent army of smaller 15mm goblins! Rather than base the LOTR figures individually I would HOTT them in stands, a perfect solution, or was it?

The planned HOTT Moria Goblin Army:

9 x 7Hd (Hoard) = 9 AP
1 x 3Wb (Warband General) = 2 AP
1 x 3Wb (Warband) = 2 AP
1 x Shaman (Cleric) = 3 AP
2 x Troll (Behemoth) = 8 AP

Total 24 AP (Army Points)

Variations:
1 x 4Bw (Shooters) = 2 AP
1 x Balrog (God) = 4 AP
2 x Warg Riders (Riders) = 4 AP (2 AP each)
1 x Gollum (Sneaker/Lurker) = 3 AP or 1 AP

It all started well, I batched my "plastics" up in groups of tens and started off in factory production mode. It became an organised ritual part of the day and the figures stacked up nicely. I even decided to upgrade my hoard numbers from five on a base to seven as I was using the 25mm basing sizes. Five on a base looked like a skirmish formation rather than a seething, dangerous hoard. So far so good and I raced through forty eight plastics in about three to four weeks. Here are the "good" plastic Moria Goblins [Work In Progress = basing + 15 plastics to paint for my Army List]

:)


Then I hit the GW metals and promptly got "metal fatigue". The "bad" Moria Goblins [Work In Progress = highlighting and basing]

:(


They just broke my rhythm and concentration, instead of a set of familiar poses they were all oddly unique. I fought the urge to open up my last packet of plastics as I deemed that would be a severe loss of face in front of the metal Goblins. I stood at an impasse.

By way of distraction I started to tidy up, or not in the case of the Jaguarundi and the late war German stuff took my eye. I started searching on the Internet for an appropriate painting scheme, I fell into some blogs and thought I fancy a go at that. So its time to be "up and at those Goblins" (any inspirational comments appreciated) , watch this space ;)

Note: On the upside, after reading a friends recent post on their wargame blog: http://thewargameshed.blogspot.com/2009/08/jws-reunion.html, l liked what I saw on the creative use of a chessboard for Balin's Tomb. Hence I shall leave a good dozen of the plastics individually based after all for those inevitable AD&D adventure nights with old friends from school.

:)