Showing posts with label Naval Wargame. Show all posts

Wednesday, 4 December 2024

Bucket List Project: Fletcher Pratt 1:600(ish) game of The Battle of the River Plate [Model Collection] HMS Achilles

This is a long standing project of mine, ignorant to the disrespectful advice on how silly and large a scale it is to play it in. True to Airfix 1970's childhood fashion, three plastic cruiser kits versus a pocket battleship kit .. recreating "The Battle of the River Plate" (see below, the final ship model for the collection, an Airfix HMS Ajax which has to be converted to its Leander class sister HMS Achilles .. which I believe is to do with the positioning of the AA battery? I will find out as I thinks there is an online copy of an Airfix magazine I need to read .. as I am not the first wanting to do this):   


The rules I intend to (first) use are Fletcher Pratt .. then we will see where that takes me. With this purchase I now have:
  • HMS Ajax (Airfix 1:600) 
  • HMS Exeter (Waterline 1:700 or an Old Russian 1:500 kits)
  • HMS Achilles (Airfix 1:600 conversion)
  • KM Admiral Graf Spee (Airfix 1:600 or Waterline 1:700 KM Deutschland)
Lets see how long it tales me to make and paint them. 

Update: 

From Bankinista, many thanks: Airfix Magazine Nov 1965 has an article on converting the Ajax kit to the Achilles at the time of the River Plate:
https://www.davecov.org/modelling/refer ... rsions.pdf

Thursday, 18 May 2023

Nimitz - Operation Freya (1/3000 Ships)

At last a use for my 1/3000 WWII Navwar naval collection (huzzah), the Nimitz rule set and its hypothetical introductory scenario, Norway 1940 - Operation Freya a RN v KM battlecruiser clash, let the dice roll and decide history (see below, slowly collected over many decades part of my 1/3000 collection which I consider as an ongoing proect): 


I guess the intention in the scenario (from Sam Mustafa's website download section) is to be a WW2 version of a Dogger Bank 'fast and furious' battlecruiser clash, with one side (RN) having destroyers and one side (KM) having a light cruiser, both sides having something capable of firing torpedoes (see below, the ships were fast out of their starting blocks with the KM hurling caution to the wind and sending in their light cruiser [Nurnberg] for a torpedo attack on the RN Hood and Repulse): 


Nurnberg was crippled and sunk, but her sacrifice was not entirely in vain (as the RN battlecruisers paid her some main armament attention) as she allowed the Scharnhorst and Gneisenau to deliver painful blows to the Mighty Hood, taking structural points away (see below, one crippled RN destroyer stays attending to the British main force [aka hiding], while the two healthy attack the German battle cruisers [gulp]): 


With HMS Hood suffering yet again (and the British return shells bouncing off Krupp armour) t'was "the better part of valour" this time for the British as they retired off table under cover of a threatened or rather attempted torpedo attack (see below, the rules showed the nice premise of a running battle - jumping between tactical and operation game boards was possible - something previously hinted at but not really supported by other tactical rules sets): 


I liked the scenario (and the way Nimitz was playing [without cheese]) so much I decided to play it again, this time over at a friend's house who had a much better "sea mat" than me! In a short summary, the British need to get lucky early or the German armour works in the KM's favour over the course of a long range gunnery dual. Note, players don't seem to be the classic missing smoke-screens, not just yet at any rate (see below, in the first run through we forgot about rolling the "dice for advantage" [I like this little tweak] - nothing is equal so KM rolled well enough to "have the advantage2, so they can watch the RN set-up in a limited "floor space" and choose their angle of attack from anywhere in their half of the board (see below, the RN force opt to make a high speed run [hence the yellow counters on their ships]):  


The RN strategy is "run fast, shoot with a full broadside and then get lucky" whereas the KM felt an uncontrollable urge to charge at the enemy with the Nurnberg - two separate [unrelated so I don't think it's genetics] German players did this (see below, in the exchange the Scharnhorst suffered light damage [structural] and the KM player learned it pays to "move fast when you can" because you are harder to hit - even if it makes your shooting slightly worse): 


The Nurnberg meets a watery grave from a bucket load of torpedoes from the leading RN destroyer (which was crippled in the process - a medal for someone) - Nurnberg's back was broken and  she went straight down (see below, he RN's strategy was working for two thirds of their battle plan - keep going fast, shooting away with full broadsides but alas missing with their shooting - whereas the KM just "got lucky" and HMS Hood (that fateful old girl) suffered accordingly, losing lots of structure points and a nice 15" turret to boot):     


A RN admiral discussion concluded that whereas the German armour was saving them from serious damage and the Admiralty would like to get HMS Hood back to Scapa to be repaired (see below, the two fresh RN destroyers were able to chase the German battlecruisers away as the RN battlecruisers disengaged):  


After seeing what torpedoes can do to KM ships the German admiral was satisfied to claim honours and retire just after the British had retired from the map (see below, the game worked really well, credit to the Germans in both games with sound tactical victories - note in the Halsey campaign this would be set up for a nice running battle over several encounters and other Task Forces trying to intercept [or hide if you were a convoy], all good stuff): 


This all bodes well for this rule system methinks and future battles. Nimitz is easy to pick up, fun to play and gives more or less, plausible historical results in a much quicker time than the likes of GQ II (my previous preferred WW2 naval rule set). I can recommend watching the SaturdayNightFights of the Armchair Dragoons fame, playthrough of Operation Freya:

Thursday, 15 September 2022

Inter War USN Planning - WWII War Plan Orange Evolution


I can highly recommend this talk from Peter Pellegrino (of NWC fame) with respect to teh evolution of the US naval strategy against the IJN aka, War Plan Orange (see below, Peter never disappoints):  

https://www.youtube.com/watch?v=KXal8JUqAfQ

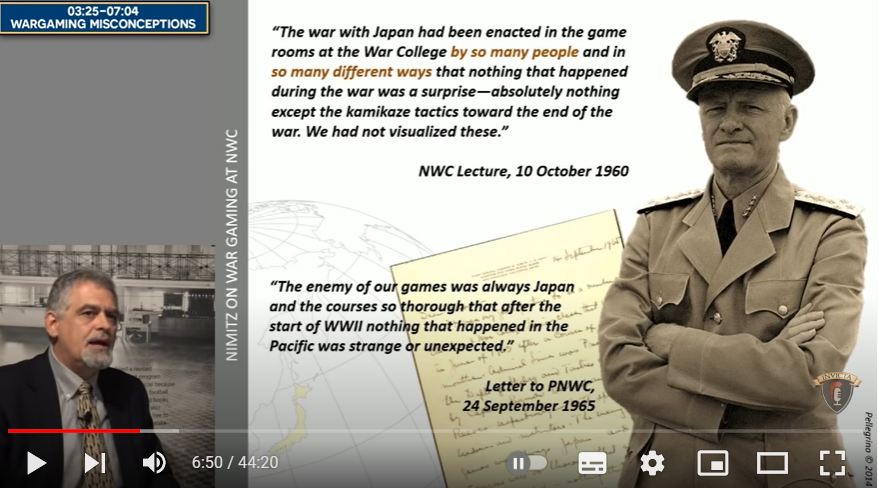
00:30 - Introduction 03:25 - Wargaming Misconceptions 07:04 - War Plan Orange Explained 12:05 - Schools of Thought 13:55 - WW2 Naval Strategy 30:36 - Recap of Myths 32:08 - Interwar Wargaming 34:23 - 1932 USNWC Curriculum 36:08 - USNWC Influence 
40:45 - Conclusion

Especially valid in putting into the correct perspective the "Nimitz Quote" (see below, not using wargaming as the oracle's tool - but rather as a tool that could sharpen a commander's mind):  


War Plan Orange (Japan):

  • Phase 1: Protect Western Coast of USA!
  • Phase 2: How do you get to Japan ["The Hard Bit"]?
  • Phase 3: Defeat and Invasion of Japan?

Fantastic though, the NWC finally goes Rainbow (see below, why have one plan when you can have four+, one of them has got to work, right?):


But at the heart of it all was the concept and practice of adversarial "gaming" .. 318 games [scenarios] .. and by god they did it every day when they were at the NWC .. learning how to play (a month of the school year) ,, both at a tactical, operational and strategic levels (see below, including multi-aggressor [even RN "Red"], multi-discipline [Sailors, Marines and Aviators] multi-spectrum [even testing out hypothetical ships] - respect and well done, that shaped the senior officer cadre for WWII): 


"And" they always finished with "The Battle of Jutland" (RN v HSF), turned on its head and into "The Battle of Sable Island" (RN v USN). Something I can perhaps aspire to use as a background campaign or scenario development for my 1/3000 Navwar fleets ;) 

Note: I did take "War Plan Red" as an "Atlantic Chase" influenced mini campaign to CoW in 2021:) 

Monday, 20 June 2022

Black Seas and the USN

Here's my story. Many, many moons ago I purchased Black Seas and expected to dive into the "age of sail" in 1/700 scale and be a Horacio Hornblower reborn. Except, the wargaming butterfly that is I moved onto another project (anybody not see that coming?) way before paint met model and rigging sail lead to s a sense of frustration, so the box sadly languished in a dark place the loft. I did construct the free (well you had to but the magazine) giveaway frigate from the cover of a Wargames Illustrated magazine, but no further progress was made with a fleet. Then (several years later) a wandering eye in the local model store, sees a bargain but - end of stock - USS Constitution, the rest is predictable history (see below, "a love story starts" with an American super frigate):  


Size can matter (see below, a case of we only budgeted for six but as the Carling beer advert says it all, probably the best in the world - normal frigate [RN/French/Spanish] in the background): 


The master plan being that with the Master and Commander starter set and WI giveaway I have six brigs and four frigates, plus the USS Constitution ("old ironsides" herself - good timbers apparently). That means a basic USN fleet of two brigs and USS Constitution, a RN fleet of two brigs and a normal frigate and two brigs and a frigate for the French! Leaving two frigates in excess, whether to reinforce the French or British fleets, or make a Spaniard is the question (perhaps a wandering Russian frigate?). The only "possibly needed" expansion would be to include the bizarre fleets of the Barbary Pirates of the Mediterranean (where the teething battles of the USN were fought on the shores of Tripoli, as per the US Marines song) or the addition of a lazy fat merchantman or two. A small self-contained project, what could go possibly wrong, provided it gets off the painting tray. 

Monday, 22 November 2021

Naval Wargaming Podcast (Man Battle Stations) and Episode 55 introducing Naval War (FREE downloadable naval wargaming rules) Link

Just discovered the "Man Battle Stations Podcast" .. Naval - Air and Space gaming, past to present and speculation into the far, far future (see below, each episode is quite long but maintains its interest, albeit w with a US focus): 


Of particular interest was the reference to this set of naval wargaming rules, focusing (I think) on WWII (see below, create a FREE account, verify you are not a Bot [the email may take a half an hour to send so go make yourself a coffee] and then you are off): 


There is some kindle reading for me to catch up on with teh dark nights closing in ;) 

Saturday, 18 January 2020

My First Cruel Seas: Italians versus Royal Navy & Russians?

Introducing the Italian fleet:

Italian E-Boat lookalikes (see below, very nice paint jobs with the diagonal red and white stripes):


Italian (very light) MAAS Boats: Strikingly fast because they have a mega Italian engine inside but little around it protecting it (see below, think Molotov Cocktail on the water waiting to be lit):


Italians enter bottom-right in two flotillas, while the Allies appear top-left (RN) and top-middle (Ruskies). I had relinquished my naval command in favour of trying to get a more holistic grasp of the rules, which meant I became "bottle top puller outer of a bag" to determine who goes next - a very important job and for "a suitable inducement I may be able to help you sir" (see below, please note the aesthetic placement of islands cunningly blocking line-of-sight):


Speed boats seemingly scattering about to the four corners of the board. Apparently there is a plan somewhere (see below, one rule that seemed strange to me was that there was little concealment - maybe we were just going in "Gung Ho" for a quick game (see below, the "wake markers" create a very nice atmospheric feel to the watery table-top - the Russian forces have divided into two to cover both sides of the right hand island which means they are outnumbered 2:1 against the Italian E-Boats, with blue splash markers denoting that short-range "gunnery" has started):


The Italians fearlessly sallied forth against the combined Allied fleets in this "What-If" scenario, sending the pseudo E-Boats against the Russians and the "bonny wee fast things" against the heavily armed RN contingent - which turned the "fast things" into match sticks in pretty short order (see below, disturbingly everything is "visible" as long as you can trace LOS - no "dummy markers" here or fear of friendly forces being in the area! One Italian E-Boat was lost in exchange for a Russian "flak-boat" [my made-up word not really historical]):


The Russian stuff blazed away and then started to burn, then something exploded and sank. The Italians definitely had the upper hand here, but the RN are coming to help out (see below, a bow pointing skyward denoted the resting place of one of Stalin's finest gunboats with a tank turret on it):


An embarrassingly "run aground and burning Italian E-Boat" is surrounded by Russian and RN "men-o-war". The crew have disembarked on dry land and have been spared the fate of a watery grave (see below, the other two Italian E-Boats seeing nothing to torpedo but lots of shiny RN MGBs to lose a stand-up fight against decided that discretion was in fact the better part of valour and "bugged out" 0 nobody blamed them):


The remaining "little fast things" of the Italian Fleet spotted a design flaw in the scenario in that their main armament was primarily a torpedo and there was nothing to torpedo. The signal flags to "bug out" were duly hoisted. And so end'eth my initial exposure to Cruel Seas, "First Thoughts"? ... it really was meant to be an exposure to activation chit and basic LOS combat, so in that sense it worked, but I would like to see a scenario that required guile, suspense and "hidden movement".

Friday, 3 January 2020

This is where my "love" of Naval Started, blame it on Paul Hague

Take me back thirty eight years to the tender age of 13 or 14 and I read this book from my local library cover to cover several times over. It therefore seemed apt and fitting to buy a second hand ex-library book (see below, the hallowed tome of infamy):


In fact with the ticket sheet intact in the front of the book, the first date in it [9 May 1983] bears a striking similarity to when I first would have read (a different copy of) it. Spooky to think "another wargaming soul" (albeit a Londoner .. as opposed to his opposite in the North)  would have been going through similar deliberations (such as how do I get my hands on an average dice and a d10?). It seems to have been well read until June 1994, an eleven year tour of duty before "retirement" (see below, badges on honour and a passage through many wargamers hands - spooky if anybody who had took this book out was actually reading this post):


This was the reason why my parents "worried so much about what I was doing in my bedroom with balsa wood, a modelling knife, strong smelling balsa glue, Cornflakes cereal packets (used for bases), matchsticks and Tamiya paints [Grey, Blue and White]". Did they not realise I was creating the Grand Fleet and German High Seas Fleet in miniature? I also have Paul Hague's later book which I found "good" too but 'wanting' in childhood memory first love sense (see below, submarines, aircraft carriers and WW2 battleships):


2020 could see the recreation of the four classic "sea battles" contained in "Sea Battles in Miniature: A Guide to Naval Wargaming". A definitive counter-point to Fletcher Pratt which has to be done in 2020 (maybe at CoW 2020?).

Friday, 19 January 2018

Russo-Jap War Naval: Port Arthur Break Out (Part 6) Freedom or Death?

Yet another similar looking Russian photo of the "enraged" cruiser action (the lighter ships do seem to get hurt when they get hit). A this point the Japanese cruisers seem to have the upper hand. The Russian battleships seem to have a fairly straightforward run off table (see below):


A vicious round of gunfire sees a damaged Japanese battleship (red hit) top left, in the middle of the battle line, but in return a pounding of the Russian flagship causing a critical hit, a steering jam pointing her to the side of the table (away from the target bottom edge) and a morale failure which hurts even further the thought/chance of getting off table [insert Japanese smile "emoji"]. Meanwhile another "silenced" Russian protected cruiser but a huge crippling explosion on the lead Japanese protected cruiser ("silenced and dead in the water"). Additionally the Mikasa is majestically leading the two damaged armoured cruisers is leading the ad-hoc formation (the armoured cruisers are actually using their own command dice) back into the fray (see below):


Not caught on camera was the escape of the battered Russian protected cruisers to Vladivostok via courtesy of the of the world/table edge "fog bank". The Russian battleships were in chaos as despite fixing the steering the Russian flagship could not fix its morale as quickly. So as they headed for the wrong edge of the table the remaining (one had sunk) Japanese protected cruisers sallied forth in a "do or die" torpedo attack on the meandering Russian First Battleship Division. They took severe damage from the Russian battleships but also managed to silence the last remaining Russian cruiser [the Rurik I think] in the run in (see below):


A lot of action was missed but this photograph helps in a way fill in the missing gaps. In the top of the picture (middle) the old (obsolete) Japanese battleships are departing along with the Japanese protected cruisers. For all their valor they (the protected cruisers) scored no hits with their torpedoes. They did however delay the Russian battleships to allow the Japanese (modern) battleships and armoured cruisers to close to effective range. The Second Russian Battleship Division is seen middle right. It has to be said the Japanese obsolete battleships still managed to deliver telling blows on each Russian battleship, as all the Russians carry a red permanent damage marker. Honour, praise and respect for their courageous commander (aka we all thought he would get sunk). Down at the bottom of the picture the First Russian Battleship Division is making its bid for freedom. However the Japanese Battleship Squadron is "peppering" their tail vigorously. The Japanese armoured cruisers are once again in the fray in a supporting fire role [the lead two ships on the left], but trying not to block "line of sight" from the bigger more deadly battleship calibre guns (see below): 


The Russians are in the home stretch, they can literally see the light at the end of the tunnel. Then "kazam!" there is a huge explosion from the last in line Russian battleship [First Division], as she goes from "damaged", to "silenced", to then "crippled" (aka dead in the water). To remove the crippled status it would take too many "Command Points" so the Russian Admiral pragmatically knows she is doomed. Lightning then strikes twicw. "Kaboom!" In the background the Second Russian Battleship Division's rear ship also suffers a critical hit leaving her chugging along at half speed. Not what you wanted when you were two "full speed" turns from exiting! (see below):


Another "almost duplicate" Russian photograph. The only thing to add was that the unfortunate half-speed Russian battleship also became silenced (see below, well actually she is the one Russian ship you cannot see is off table top left silenced):


End Game: 

The game as it ended (there was a family keen to sit down and eat their supper) as night fell. Where have all the Russians gone? All off to Vladivostok I suspect apart from one crippled stationary battleship and one critically damaged half speed battleship (their names sadly escaped me) that the Japanese have eyes on sinking. A third lingers top right but will depart into the "end of the world" fog bank with her next move and there is nothing the Japanese can do about it (see below):


The verdict?

Well most of the Russian Fleet is off table heading to a friendly port (albeit some perhaps looking a bit like a battered colander). However they are shell torn (certainly the cruisers) and battle worn (battleship wise) but are free from imprisonment. The Japanese Admiral was keen to claim the two Russian "limpers" as sunk or captured. That would mean an even 4:4 ratio in battleships, but Tojo also has a squadron of armoured cruisers. Yes he did lose a couple of protected cruisers (and a few more damaged) but it was the battleships he was after. A tactical win! Now strategically the Russian can feel more happy. As he knows the Second Pacific Squadron (along with the Third Pacific Battle Squadron) is en route (if they can get past the Hull fishing fleet that is). So when they turn up instead on a breakthrough to Vladivostok Operation Mark II, Togo is facing a potential "pincer movement" and a fight for his life well outnumbered in modern battleships (the Russin "Borodino" class to be exact).

Tactical: Japanese

Strategic: Russian Advantage

The rules: Simple and brilliant, highly recommended, all I have to do is now go away and read them! As it was a "spontaneous game" we had just thrown a mat down without consideration about the "table edge end of the world" syndrome. Not a great matter here but something to consider for more meaningful campaign games .. where results from one game get pushed into another. The sum of little things counting!

Tuesday, 16 January 2018

Russo-Jap War Naval: Port Arthur Break Out (Part 5) Tooth and Claw

The Russian Admiral seemed to like to take very similar "pairs" of photographs. Perhaps Russian intelligence has developed a stereoscopic 3D image viewer? Anyway, top left you can see a pesky Russian destroyer flotilla have laid a defensive smokescreen to cunningly shield the main squadron of Japanese battleships from hitting the First Russian Battleship Squadron. Over to top right, the reverse situation is in play where a Japanese destroyer flotilla shield the Japanese Obsolete Battleship Squadron from Russian battleships. Meanwhile the two squadrons of protected cruisers (one Japanese and one Russian) fight it out at the bottom of the picture. One Russian protected cruiser has received critical rudder damage and it sailing in the "wrong direction". To the left hand side the Mikasa and the two Japanese armoured cruisers have reformed from their disorder and are attempting to reenter the battle. The Russians are hoping to vigorously "punch through" (see below):


The same scene from a slightly different angle. The Russian heavy forces look like they might just have enough momentum to push on through, if the Japanese Protected Cruiser Squadron can be disposed of (see below):


The smokescreens dissipate and a maelstrom of battleship gunfire erupts. Although it is within effective range the renewed opening bout of salvos are strangely bloodless. The Russian destroyer flotilla (now without torpedoes) which has strayed too close to the Japanese Battleship Squadron is however "damaged" for its troubles. The major conflict here is between the protected cruisers at the bottom of the picture  (see below):


Spot the difference? A missing orange tape measure? Note the Mikasa bottom left, taking "a pop" at the protected cruisers (see below):


Again the Russian Admiral was keen to take "composite" shots of the scene from various slightly different angles. Nice photographic composition (see below):

Note: The edge of the table seen [right] below is no good as the Russian Fleet has to escape to the bottom of the table, past the Japanese protected cruisers.


Panning out you can just see the "exit table edge" to the right hand side and the orange Japanese tape measure on the left hand side (see below, bottom right):


The cruiser action up close. In the initial exchange the Japanese were besting the Russians as all the Russian ships were carrying permanent "red damage" markers. It is just the question as to whether the Japanese can get in a killing blow. A second hit is "silenced", but a third would be "crippled". The only thing to add is that the Russian battleship van is also "carrying damage" with two out of three of the battleships carrying a "red" hit (see below):


The battle is approaching its climax!

Next: The Final Push

Saturday, 13 January 2018

Russo-Jap War Naval: Port Arthur Break Out (Part 4) A Crisis Point in the Breakout Battle

The battle has formed as the Japanese Admiral Togo wants it. He it heavily engaged with a portion of the Russian battle fleet (thus having a slight numerical 4:3 advantage) and is trading blows to his advantage. Also by threatening to cross the Russian "tee" they are changing course, The old obsolete Japanese battle squadron (made of captured ex-Chinese battleships) is catching up and his protected cruisers are on course to intercept the Russian protected cruisers. Tojo is much more interested in stopping the Russian battleships from escaping than anything else (see below):


A close up of the battleship action sees that the Japanese have traded two 'red damage' hits given to one taken. At this point it is critical they follow up and cripple the engaged Russian battleship squadron by pressing home and taking the initiative (see below):


However the Japanese Admiral faces a dilemma as at the rear of his battle line, where the armoured cruisers are stationed in a separate division, they have been worsted by the Russian protected cruisers and long range battleship gunnery from the second Russian battleship squadron. The lead armoured cruiser is silenced with critical steering damage, swinging out of line of battle (see below):


Suddenly all is chaos. There is a profusion of destroyers laying defensive smoke screens (using the ever so useful 'belly button fluff' from the tumble dryer). A Russian destroyer flotilla shielding herself from the long range fire of Japanese obsolete battleships (see below, top left), a Japanese destroyer flotilla shielding the obsolete Japanese battleships from the Russian second battleship squadron (see below top right) and finally retreating armoured cruisers from the Russian protected cruisers and long range Russian battleship fire (see below, bottom right). Confused? That's how the battle was. Very confusing! In addition to all the smoke the Mikasa had suffered a second red hit silencing her and in addition took a critical steering hit. This deluge of damage demanded a morale test which Togo failed (in a very untimely and uncharacteristic way) and the Mikasa sadly limped out of line (see below bottom left above the Japanese protected cruiser squadron). The three remaining Japanese battleships still managed to maintain contact with the Russian first battleship squadron, keeping the contest "hot" (see below):


The Russian Admiral senses a chance to achieve his "breakout". He is over half-way down the table [two thirds if you look at the lead Russian protected cruiser squadron -see below bottom/middle right] and the Japanese barrier of impenetrable (mostly British made Vickers Armstrong) steel has been broken into three parts. The obsolete Japanese battleships are engaging the Russian second battleship squadron to their disadvantage, the three Japanese battleships are crossing the reverse "tee" of the Russian first battleship squadron and Mikasa has been recovered (spending lots of command points to remove the second red damage marker indicating "silenced") and has formed a composite battle squadron (see below, middle/bottom left) with the disengaged Japanese armoured cruisers. Finally the Japanese protected cruisers have positioned themselves in a good place to cross the Russian protected cruisers "tee" (see below):


The Japanese commander has command and control headaches. Togo needs to bring the disparate elements of his battle squadron together and attack the Russian battle squadron before they "turn the corner". This may mean sacrificing the obsolete battleships (well fully committing them .. to almost assured destruction ) and bringing the Mikasa back into the action as soon as possible. The down side is that the Russian Admiral, with an uncharacteristic national attribute (for a 1904-05 Russian Admiral), has been astute, resolute and has managed to coordinate and concentrate his forces effectively.

Note: At this point the Japanese Admirals camera phone "ran out of power". Fear not, the Russian Admiral took over and has supplied photographs from the "Russian perspective" of the second half of the battle. The "race to the edge of the table/world".

Thursday, 11 January 2018

Russo-Jap War Naval: Port Arthur Break Out (Part 3) Fire All Guns that bear at the Bear!

The Russian destroyers sweep past their Japanese counterparts unabashed and bravely face the "obsolete Japanese battleship's secondary armament" which proves to still have teeth as well as ornate paintwork. One Russian destroyer flotilla is "dispersed" (some sunk, some damaged and some morale broken) and takes no further part in the battle. The second Russian destroyer flotilla conducts a torpedo attack but is unsuccessful (see below, red shell splashes indicate where the first Russian destroyer flotilla used to be):


From the "viewpoint of the gods". The Russian Fleet is steaming down the middle of the table, bar the destroyer attack on the top right of the photograph. The objective of the Russian Admiral is to breakout to Vladivostok with as much as his fleet as possible. The Japanese have him hemmed in on three sides (see below, Togo and the battle fleet to the bottom, protected cruisers to the left and obsolete battleships to the right):


The Japanese main battle line find the range of the leading Russian battleships. The Japanese Admiral chose (unwisely) to engage opposites and thus spread damage along the enemy battle line, whereas the Russian Admiral chose to concentrate his fire on the Mikasa (and Admiral Togo) and try and take him out of the battle (see below):


The IJN Mikasa bears the brunt of the Russian fire but sails majestically on (see below):


Meanwhile the Russian "protected cruisers" come into range of the two Japanese "armoured cruisers" trailing the main Japanese battle line and score a damaging hit on the leading Russian ship (see below):


Good shooting by the Russians "returns the compliment" and the IJN Nishin is rather unexpectedly damaged in the exchange of fire. At this juncture the Russians are in danger of having their "tee" crossed but paradoxically they need to surge through the enemy lines at all costs (see below):


Telling blows are being landed at this point. The Russians and Japanese are committing their battleships to a "slugging dual". The end of the table is an artificial "end of the world" and represents either a fuel limit or fog bank that saves/hides any ship that enters.

Next: Forcing the Gate (or not)