Showing posts with label Western Desert Force. Show all posts

Sunday, 6 February 2022

Operation Compass: Tamar West - Operational Planning Map

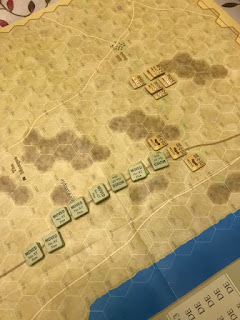
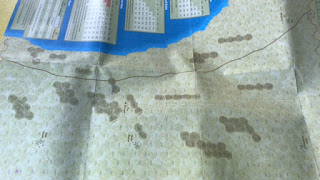
As the attack on Tamar West unfolded through the Zoom sessions, as a British player, I tried to keep track of the assault as it progressed up the board. From the turret top of the Matilda I tried to keep a careful annotation, but as you can see the continuous movement made my hand very shaky (see below, hard black ink for the first session, red for the second phase of the attack  ): 


The intensity of the artillery fire is in proportion to the density of the ink. Respect is due to teh Italian gunners who stayed with their guns until the last.

But is it air.

Thursday, 3 February 2022

Operation Compass: Attacking Tamar West

In preparation for my Beda Fomm game Martin from the Sheffield "Zoom" wargame kindly group laid on an Operation Compass battle for Tamar West, a little known quadrant of death that was an Italian fortified strong point in 1940 that Wavell's Western Desert Force had to take down. Appearing out of cover of a convenient desert sandstorm [for the British] were two columns of lorry borne British infantry and the sound of clanky tanks of Matildas [still off table in the photograph below] approaching from the the brown track, bottom left in the photograph. One British column of infantry drove straight up to the base of the Italian camp, dismounted and close assaulted the Italian across the barbed wire - heroic stuff (see below, a fortified patch of three hexes in the centre of the set-up and the road leading off to the right were the British objectives - a tight task to do in only nine turns):  


The Matilda's make good use of the road but the battle always seemed to be in the next hex away. Meanwhile both British columns of infantry are getting stuck into the Italians, although the latter column got shot up on the way in while riding on the trucks. Time was expedient so the risk was well taken IMHO (see below, British trucks are seen wisely getting out of the way of this "fighting stuff"): 


The Matildas make it to gates of the camp to find it already in British hands (again the battle is always one hex away) as the British infantry relentlessly punch over the hills trading blow-for-blow with the Italian infantry and Italian Gunners, who die by their guns (see below, only turn three and the British are half way over the first objective - it is a fast pace but it has to be for the British to win in nine-ten game turns): 


Consternation as the Matildas have to go off road (they are very slow) but the inside of the camp is being pummelled by Italian Artillery (coming in danger close) and already over-stacked with assaulting British Infantry (see below, a target rich environment with little cover): 


The final fort hex is assaulted and the fort of Tamar West is now in British hands with Italian infantry trying to regroup in a wadi outside, despite being ineffectually machine gunned from the light Besa MG's of the British Matildas - at least they are close enough to shoot (see below, the Italian infantry has to be eradicated before the British move on to secure the exit - but what is this, Italian reinforcements appear on the very table edge hex the British are after): 


The regrouping Italian infantry are caught by a storm of steel as the British Infantry charge out of the newly captures fort and destroy them entirely before they can fully regroup. The British pay a hard butchers bill, now down to two companies from an original force of two battalions (see below, the Matildas advance into the fort with intention of driving on the the exit "through" the Italian L3 MG carrier armour): 


The bravery of the British infantry literally  know no bounds as they pin the Italian L3 MG carriers in place, dropping 25 pounders in amongst the antiquated armour causing mayhem (see below, the game will rest on the sequence of randomised activation and and whether the Matildas can travel three hexes in two turns): 


The L3 MG's take away another British Rifle Company away but the combined effects of the British artillery (including I am told some antiquated museum piece WWI era sixty pounders appearing in the British Order of Battle) and Matildas have quiet ruined them as a fighting force (see below, the Matlidas are two hexes away with the very last turn to come): 


Turn 9 and the "victory exit hex" falls into British hands, for a narrow win - with the British artillery induced (and Italian failed) morale check, along with the menacing sight of the untouched advancing British Matildas just being too much for the last Italian infantry unit. You can understand it, bereft of AT guns [and therefore subject to "tank fright" in the rules], under nasty artillery fire and to crown it all out in the open - but they have made the British have paid a very heavy price in infantry for Tamar West (see below, the only surviving Italian unit being the battered L3's lurking two hexes away from the road and trying to rally): 


A very historical outcome, though close run thing, with the Matildas next tasked to trundle on to guess what? Yes, the next Italian strong point, presumably picking up some fresh infantry on the way. 

Wednesday, 26 January 2022

Heading to Beda Fomm .. a troop of A13 Mk IIa (10mm Pendrakon)

All this talk of the simulation of the battle of Beda Fomm has left me (or the collective "us") a few models short of being ale to create the British RTRs for Beda Fomm on the table top. Particularly because the A9, A10 and A13 fleets of British cruiser tanks did not have a long shelf life, particularly when they later came into contact with the Africa Korp. So A9s, A10a and A13s don't make it into the 1942+ battles, which is the popular 8th Army collection phase [for us currently]. Therefore "I had to" (or rather chose to) order some early war British kit from Pendrakon - well that was my excuse anyhow. That really meant I better start painting the three A13's I already had (see below, stunned into action I have primed in the Airfix acrylic primer grey): 


Next stop will be a Vallejo Brown Wash and a dark sand colour. I am thinking four collections of three tanks  (comprising or rather representing a squadron) would make up the armoured regiment, with a couple of the precious CS tanks (which could fire HE to take out AT Guns and fire smoke) in the HQ Troop. That should be enough for Beda Fomm as the cruiser formations were understrength by that point in the campaign anyhow.

Monday, 24 January 2022

Beda Fomm - Board Game Play - Play Testing

You read the set of rules, they seem straightforward (but even ten pages can contain a lot - now don't get me talking on DBA's six pages of simple rules needing seventy two pages of fan based explanation spanning several years of collaborative argumentation - over the meaning of rules after well-meaning and competition gamers get their mucky little hands on them) but until .. you get the playing pieces out on the board and start moving them around .. you don't realise the limitations of the brain's short term memory in understanding stuff. All good fun when play testing with friends though (see below, Beda Fomm set-up after what we thought was an accurate turn one - but looking at the board, flicking back to the rules and then reading the small print we realised "how wrong we were"): 


In the above you see an overuse of the "Move - No AT Fire" marker - which looked messy and we thought that cannot be right. Reading the rules again we find this isn't needed for all troops as not all troop types have AT fire capability (makes kind of sense). So particularly with respect to infantry, AT and Artillery if they do have inherent AT capability and they move they get a marker (tick). Art, AT and Regular firings are split out into different phases so this is an  fiddly but important "aide memoire" for the game (and as I sit typing I could not tell you for sure if that also applies to armour - I don't think so as it represents set-up time for guns etc but I will have to check). 

Secondly stacking limits really make this a "puzzle game" (as per the comment in the video I watched), but the Italian has some crazy "battalion sized truck units" (that represent feeing Italian non-fighting admin units) that have "minimal combat value" (aka the mighty "1") and serve mainly to get in the way of Italian unit movement and be VPs for the British and Commonwealth player. As it is a battalion size it will block another battalion from moving through them on the road - but the Italian has the option of "parking by the road" (stacking value zero but an auto kill if in combat). On the game test we even read simple movement values wrong, as we saw one Italian unit had a movement value of eight which translated into thirty two road hexes (wow) .. but only as we were packing away did we discover other units had a value of six (twenty four road hexes) so the convoy would really have travelled at the speed of the slowest unit until "first contact" with the enemy. This meant that the above board is wrong and a turn one encounter is impossible which also explains why our first move looked so unhistorical (as historically British and Commonwealth infantry blocked the road while the armoured cars prowled the flank shooting up "parked" lorries - but as we were playing it, the infantry would not have time to get there). 

As a design comment I can so see Frank Chadwick's interest in morale (which came through hard and fast in the later Command Decision set[s] of rules), as each formation (not counter) has its own morale tracker. Some of the Italian (mostly infantry) start really low at 6 (and as morale checks are equal to or under this value on 2d6, they are already behind the curve). Lots of combat results ask for "morale checks", lose one and you can die or retreat - and losing a morale also check means your formation "morale tracker" goes down by one and as continual combats keep asking you to pass a "morale check" - life becomes very hard vey quickly, which makes a nice vicious circle. With all these vital statistics captured on the board with small counters on tracks, it is a game that you don't want to play around cats or small inquisitive children! Nevertheless I am looking forward to the next game test when we move onto a bit of combat. I am interested to see how the game plays for the first five turns as the game quickly board fills up with Italians facing Combeforce (the RTR start arriving for the British and Commonwealth forces at the start of turn six). 

Note: The goals here are to (a) play the game in full 'correctly' and (b) spot battalion+ sized vignettes on the table top in Command Decision.


Sunday, 16 January 2022

Beda Fomm Board Game - YouTube Game Report (1979 version)

https://www.youtube.com/watch?v=T7TBpoAj1Qg

Found by a friend for me, amazing what is out there on the internet!

Interestingly this was for the 1979, not 2010 version! Point taken with respect to it being a scenario specific puzzle game based on the uniqueness of he Beda Fomm circumstances rather than a generic battle system. 


Thursday, 13 January 2022

Beda Fomm Boxed Game

A few weeks into 2022 and already there seems to be a steady meme or theme to my interests emerging, aka around the battles from the early Western Desert 1940-41 with the Western Desert Force taking on the Italians 10th Army. I was just thinking out loud to myself on a previous post of pushing this thought experiment forward, along the lines of perhaps revisiting the old Command Decisions rules set (aka Frank Chadwick) .. Benghazi Handicap being long out of print and circulation (but there is a Beda Fomm scenario on the Command Decision: Test of Battle website). Then out of the blue a good friend (who read the earlier blog post) sent me a special "surprise" package through the post - a very, very relevant game called Beda Fomm. This is an absolute gem, being a Consim Press 2010 republished version of a 1979 game from Frank Chadwick [yes, of my favourite Command Decision fame .. but note the year "1979", this is pre-Command Decision I publication date, but reading the game you can clearly see the influences coming through that he tool and emerged/developed into Command Decision miniature rules set]. Please see the Boardgamegeek links below for more detail (see below, and it just goes to show that a "good game" is still a "good game" no matter the "age of the game"; the difference between the two edition just seems to be more of map and counter production quality not rules):

1979: Original

https://boardgamegeek.com/boardgame/6914/beda-fomm

2010: Re-Published

https://boardgamegeek.com/boardgame/72941/beda-fomm

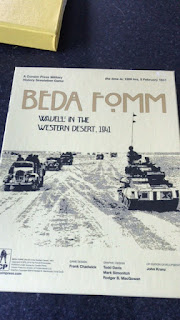
There is some lovely evocative box art too on the new game too, along with excellent quality counters and maps inside (see below, you have got to love seeing those MK VIs tin-can light tanks looking busy as they boldly go striding across the desert): 

The actual game map (or battle area) is only a very small part of the Western Desert as the battle came at the very end of Operation Compass - when the Italians were in full retreat and was in effect a brilliant "closing the door" swinging movement of British armour from out the desert which sealed the fate of the Italian 10th Army once and for all in Cyrenaica (see below, the map; the plan is to play the game to see where the battles occur and then put this area of interest onto the table top under "Edition One(?)" Command Decision [CD I]): 


Note:
All this Western Desert Force interest in 10mm means that there has been lack of painting progress on the15mm Malburians - they are "furloughed" as such for the time being, but rest assured their time will come.

Breaking News: Somebody else seems to be doing something very similar to me in 2022! Lovely terrain, some nice 6mm models and Command Decision (IV) Test of Battle, see link below: 

Monday, 3 January 2022

Test of Battle Beda Fomm Scenario

The last revision of the Command Decision WWII wargame rules system was Command Decision: Test of Battle (see link below): 


The site itself does not seem to have been updated since 2011, however from here you can see the OrBats and scenario (see below, a screenshot of the British Order of Battle):


And the Italians too (see below, quite a few M13/40's required)


Command Decision formation morale values are shown (see below, not sure what game system WPD is referring to)


The aim for me is perhaps to do this in 10mm Pendrakon. It would be interesting to find out if CD: Test of Battle (or any other variant is still actively being played in the wargaming community). There does seem to be "some" activity on the linked CD:TOB forum. 

Sunday, 2 January 2022

WWII Western Desert interest for 2022

This will be a thing for me in 2022, the Western Desert theatre of operations - starting with the British 1940 Western Desert Force (O'Connor's boys) Tolls Royce Armoured Cars, those quaint light (MK VI) tanks and woeful early cruiser tanks (A9, A10, A13). Doing it in 10mm Pendrakon (see blow, my first British Cruiser troop assembled - A13 Cruiser Mk II): 


Meanwhile scanning the internet and bookshelf for inspiration ... and hitting You Tube over the remaining part of the holiday ..

Operation Compass: 

https://www.youtube.com/watch?v=b71kdhj27rk

https://www.youtube.com/watch?v=jw4-ytNktYg

Churchill:

https://www.youtube.com/watch?v=NK0FNnTX6c

Monty:

https://www.youtube.com/watch?v=a1QapjJzTRE

https://www.youtube.com/watch?v=duOYnIGivys

Recommendations gratefully accepted ;) 


Sunday, 12 December 2021

A13 Mk II British Cruiser Tank: 10mm Pendrakon

Time to see how this little fella paints up. Recently picked up from the Battleground 2021 Stockton Show from Pendrakon miniatures(see below, the early war Western Desert Force, the precursor to the famous 8th Army): 


I am keen to build up an early war British force to face against my painted Italians, probably using Sam Mustafa's Rommel as a set of rules. I also have some 8th Army Infantry to paint up. First I should check out what tanks were with the 7th Armoured at this time.

Additional source of inspiration for this Western Desert Force project scenarios courtesy of Bob Mackenzie's website:
Orders of Battle and Command Decision Websites: