Tuesday 19 July 2016

Perla of a Wargaming Book

An old book, published circa 1990, but still an interesting read nevertheless (see below):


True more "board game" than "table-top" but strikingly deep in theory.

Sunday 17 July 2016

At last I now know what UHU glue is for ;)

Hopefully not a controversial social statement but this cheaply available glue (£1 from retail shops) has always beguiled me at to its actual designed purpose as it did not do "plastic on plastic" which is what 95% of what I want glue to do. For the other 5% of the time I use "cheap" (again £1 for many tubes) of super-glue or PVA: 'metal on metal' usually, but occasionally 'metal to plastic' or 'paper to plastic'. However returning to an old basing project where I had fifty plastics [1/72 Revell/PSC/Italeri US Infantry] based to metal via superglue every one came off in my hand. Urgh! In desperation I turned to the wrinkled UHU tube last used for a 'paper to paper' school project (a paper Viking ship, approximately 28mm) and "globbed away" (see below):


Hooray .. it seems to have worked.. I think (watch this space). I immediately went out to the shops to stock up on this useful product ;)

Wednesday 6 July 2016

Someone just "had" a real, live Panther Tank in their basement are you serious?

http://www.bbc.co.uk/news/blogs-news-from-elsewhere-33381772

Germany: WW2 Panther tank seized from pensioner's cellar

  • 3 July 2015
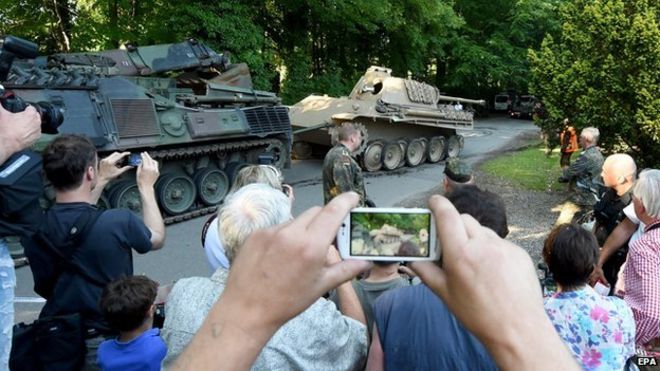
A crowd of people photographing the Panther tank after it was removedImage copyrightEPA
Image captionSlow progress: It took hours for the army to remove the tank from the basement
Police in northern Germany have seized a World War Two tank which was being kept in a pensioner's cellar.
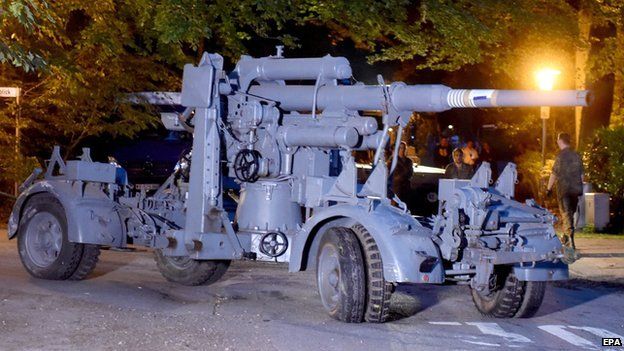
The Panther tank was removed from the 78-year-old's house in the town of Heikendorf, along with a variety of other military equipment, including a torpedo and an anti-aircraft gun, Der Tagesspiegel website reports. It wasn't an easy job to get it all out - the army had to be called in with modern-day tanks to haul the Panther from its cellar. It took about 20 soldiers almost nine hours to extract the tank - which was without its tracks - and push it onto a low-loader, the report says. As the surreal scene unfolded, local residents gathered at the end of the driveway to watch.
Prosecutors in the nearby city of Kiel are investigating whether the man's military collection violates Germany's War Weapons Control Act. But his lawyer says the weapons are no longer functional, therefore shouldn't be restricted.
Local prosecutors were tipped off about the cellar's contents by colleagues in Berlin, who searched the home for stolen Nazi art earlier this year.
It seems the tank's presence wasn't much of a secret locally. Several German media reports mention that residents had seen the man driving it around town about 30 years ago. "He was chugging around in it during the snow catastrophe in 1978,"Mayor Alexander Orth was quoted as saying. But he later added: "I took this to be the eccentricity of an old man, but it looks like there's more to it than that."
The anti-aircraft gunImage copyrightEPA
Image captionThe man had also been keeping an anti-aircraft gun in his basement

Nice to be back posting!

You know what, sometimes you think you have to cut-back on hobby stuff as real-life stuff takes precedence, sure, but never cut it out as that "other real-life stuff" benefits from the release you get. Nothing earth shattering has happened to me but I've missed you guys and it great to see everybodies posts are as good as ever

:)

Blog on!


Tuesday 5 July 2016

15mm Sci-Fi : GZG Yaeter (Squad 1)

My 15mm Star Gruntz project has been long stalled, but a chance meet-up with some wargaming buddies rekindled my interest (it doesn't take much to distract me) as I was shown a very nice "little tactical force" I can but only try to emulate. The beauty of SCi-Fi is that material comes from a variety of sources, Star Wars models (Republic Gunships), Heavy Metal Gear (Large Warbots) to bespoke 15mm GZG and "remodelled" cheap dinky models (APC's). Hence I start with an Airfix primer and Vallejo Wash (see below):


Next to base coast them in Vallejo Stonewall Grey and highlight it Vallejo White (and Airfix Satin White) with a dirty Vallejo Sepia "dirty" Wash. As per my previous attemprts:

Sci-Fi Yeater

Should be plain all-out FUN

Monday 4 July 2016

20mm American WWII Infantry (Airfix Battles and Chain of Command)

With an eye to playing an American force with the 'Chain of Command' rules and using figures instead of counters in Airfix Battles I gathered together my various "virgin, part painted and fully painted" plastic US Infantry figures. None of the "fully painted" category makes it to the full OrBat as required so some "painting tray" work needs to be done. As it stands I have US Infantry (excluding paratroopers and US Marine Corp) from the following manufacturers:
  • Valiant Miniatures (23mm)
  • Plastic Soldier Company
  • Caesar Miniatures
  • Revell
  • Italeri (new not old Esci)
Given the OrBat needs of "riflemen" no one manufacturers (with the possible exception of Valiant) packet suffices to make a whole 'Chain of Command Platoon'. However each manufacturer's packet can easily make an individual squad though. Therefore by careful deduction as I need three squads plus a HQ section, multiple manufacturers shall be used:
  • Platoon HQ: Lt (Carbine), Sgt (SMG) and Bazooka Team (Bazooka + 2 Crew)
  • Squad 1: Corp (SMG),  Rifle Section (8 Rifles) and BAR Section  (BAR + 2 Crew and 1 Rifle)
  • Squad 2: Corp (SMG),  Rifle Section (8 Rifles) and BAR Section  (BAR + 2 Crew and 1 Rifle)
  • Squad 3: Corp (SMG),  Rifle Section (8 Rifles) and BAR Section  (BAR + 2 Crew and 1 Rifle)
I decided to paint a section from the Plastic Soldier Company, (new) Italeri, Caesar and finish painting up a squad I started a decade ago of Revell 'Ardennes Infantry' which gives me four squads (yes one more than I need, but there are extra things also required from the American "support list" and an extra squad is one of them). They are also all 'size compatible/interchangeable' something that Valiant fails at (it would have to be a full OrBat or nothing). This means the "painting tray" looks rather full (see below):


I am following my preferred painting pattern as of late. Airfix Grey 01 Acrylic primer followed by a Vallejo Wash, in this case Black. The Plastic Soldier Company (PSC) are first up "primed" (see below):


The "washed" Black (see below, though this may not go down in history as the most informative picture I have ever taken!):


Next stepis to follow my old posts on Valiant US Painting instructions.

Sunday 3 July 2016

Fire Move Game: First Adversarial Game

Simulating War - FireMove Game

Commentary:
First adversarial game with generated terrain with four players in two-player teams, German (defenders) and British (attackers).

Rules Note:
We are playing with the Farren amendments (see Simulating War Yahoo Group) that states British HMG and Mortar firing does not accumulate British ammo usage [every "sixth" British rifle platoon firing removes one of the British units that had fired that turn from play]

Generated Terrain:
Very sparse only five terrain filled hexes generated [three woods, one farm complex and two low ridges (Note: These may be hard to see but are centre left of the table behind the woods and top left)]

  • 48 hexes with 1 in 6 chance of a terrain feature
  • 6 terrain features generated lower than normal chance

Set-Up:
German player chose Left Hand Side (LHS) baseline.
British player advances onto all plain baseline on the Right Hand Side (RHS) baseline.

Note: Two red bottle-tops denote farm complex hence the name Bottle Top Farm being used throughout the course of the game

The Board: 


Turn 1 German defensive positions:

The Germans refused their left flank and doubled-up platoons near Bottle-Top Farm. The one space gap hexing between German Platoons, as per many a familiar board game, (although no board game style "zones of control" are in play in this game) stops the British catching multiple Germans with 'one shot'.

Note: All the German positions are considered "dug-in" (1 x Ridges, 4 x Plain, 1 x Wood)


Turn 1 British "Move-On" and Artillery Barrage:

Four British Platoons are brought on. HMG Platoon is central unit, third counter up from the bottom RHS. Each German counter in Line Of Sight (LOS) of a British Platoon (Infantry or HMG) is attacked 1d6 (5-6 suppresses) by the artillery (see below):


A mixed bad for the British as only one German platoon in central wood is suppressed (see below):


German Turn 2:

Bottle-Top Farm is occupied by a German Platoon that goes from Dug-In to Mobile but the Farm Complex's protection is equivalent to being dug-in. The German rolls appalling  combat dice, the mortar comes in but misses the British HMG rolling a one and the German Rifle Platoon fire is equally dire (see below):

Quote: "I didn't think I would roll a one there (aka the mortar fire)!" As the German players collectively shook their heads at their ibad combat dice.


Turn 2 British Player:

Caught between the dilemma of getting troops on the table, but not wanting to offer 'cheap targets' for the Germans. What to do? How many and how soon to bring them on?

Rule Note: Distanced fire combat is not from one hex to another but from the firer to a target hex and another adjacent hex (provided it is in LOS to the firer). All units in the hexes are attacked with the same dice roll.

The British player opts for the option of just pushing one platoon forwards (see below, top right) and trying to suppress through HMG, Mortars and two rifle platoons the defenders. Fear of crowding the baseline stopped the British from bring more troops on. In retrospect this may have been too cautious a strategy.


Turn 3 British Player:

Without exactly knowing why the British Players found themselves being lured into attacking Bottle Top Farm. It is questionable whether the German should had edged forwards and expose himself to the British attack. The British deem there is no time to lose and are pushing infantry platoons forwards in "haste".

Rules Note: The British Player can suppress a German dug-in infantry platoon from afar, but would not cause casualties. Casualties for dug-in troops have to caused by close assault, aka being attacked from an adjacent hex. This seems historically to be true.


Turn 4 British/German:

The focus of the British attack is now at the German right (with two full companies) but "for want of a reason not to" the British are also attacking company strength at the German left (was this wise?). Out of necessity the British player deems it prudent to bring on the mass of  his troops and get on with it. Some troops to "Fire" and some troops to "Move" [get it?], but would it be wiser to remember "Fire, Move with a Reserve" is the official British Army doctrine. So perhaps"Fire-Move-Reserve" would perhaps be a better game title (see below, Bottle-Top Farm is being readied for attack):


Turn 5 British/German: 

The Germans put up a furious fight at Bottle-Top Farm and all along the central front (see below), needing only 2+ to hit the adjacent British Infantry, whereas the British require a slightly harder 3+ in the terrain held hexes (wood and BUA).

Observation: The British players discover to their dismay, how many times "almost sure fire attacks" can still fail in this game .. so frustrating. If you really want something, best insure you will get it. Focus on localised wins.

The German player remains in place! (see below):


British/German Turn 6: 

Bloody resistance at the Bottle-Top Farm (a weary sigh from teh British Player) defies all laws of known statistics and pseudo mathematical enquiry (were the dice loaded?). This is most unexpected. The siting of the Vickers HMG is also brought into question as it cannot support the attacks and the mortar cannot come in "danger close" for fear of a "Blue-on-blue". Despite the focus of the support assets the British attack on the German left is beginning to frizzle away (see below, also note the British have taken their first combat and ammunition attrition casualties, the Germans are still untouched apart from spending a lot of mortar ammunition for little practical effect):


British/German Turn 7: 

Finally the German Platoon at Bottle-Top Farm redoubt is eliminated. The German player chose to take off the casualty  here as opposed to the dug-in central plain hex as there was a "local German reserve" lying in wait behind the Bottle-Top Farm hex. Meanwhile the German 'Left Hand Side' Platoons were suppressed the British moved up their two remaining platoons on their right [1 KIA and 1 Ammunition Depletion] though it did not look a promising prospect (see below):


British/German Turn 8:

The Bottle-Top Farm Hex is occupied and the German Dug-in Platoon on the plain is also lost as a 'KIA'. Finally 'a good turn' for the British player. However the British Platoon will inevitably be close-assaulted by the German "ambush party" silently waiting behind the farm next turn. To the top of the photograph the British attack is turning into a "low odds" attack, pinning at best .. a wargaming lesson to be learned perhaps (see below):


British Turn 9:

The British player moves up to reinforce success in the south (bottom of the photograph) while relegating the northern attack to a now lost 'pinning operation'. The German "ambushers" are in turn close assaulted and a furious, though at first inconclusive (low dice rolls affected both sides), fire-fight ensues (see below):


British Turn 9:

The final German "right flank" Platoon is removed from play as the British successfully close assaulted it. The "gate" is open (see below):


German Turn 10:

The German Rifle Platoon in the central wood is in extremis being attacked on three sides (see below):

Rules Note: If more attention had been paid by the British players to the VP tracking then one of those Platoon would probably have been better placed running to the baseline instead (however remember that point made earlier, if you want it better make sure you take it).


British Turn 10:

The final position before race to the 'German Baseline' as the British have only one more movement phase left to come. 2 VPs await in their grasp provided that the Rifle Platoons remain "fresh" at the end of the German Turn 12 (see below):


Turn 11 British and Turn 12 German:

On British Turn 11 the central German Rifle Platoon is killed in the wood (maybe it was worth making sure of the kill by keeping that third British Platoon in the attack). The German Platoon had been a thorn in the British side for eleven turns, quite heroic. At the end of game (German 12 as the British do not get a go on turn 12) the British have managed to "turn" the German left by reaching the enemy baseline and finally break/eliminate the troublesome German rifle platoon in the center a seemingly good result. The HMG and Mortar had successfully suppressed the only German Platoon with LOS to the British Rifle platoons to no last minute German sting in the tail (see below):


Final Victory Point Count:

Who won?

Germans:
4 VPs from British Rifle Platoons KIA + 2 VPs for Surviving Rifle Platoons on table
Total: 6 VPs

British: 
4 KIA German Rifle Platoons and 2 VPs for Fresh British Infantry Platoons on German Baseline Hexes
Tota: 6 VPs

Result: DRAW

Although it has to be said the German players thought they had "lost it" as their defensive line had been broken. The VPs reflect that the Germans had done enough to "buy time" to safely retire to positions further back without being destroyed and inflicting similar level of casualties on the British side.

Rules Note: The Germans only count casualty KIAs as VPs not those retired because of ammunition depletion.

Saturday 2 July 2016

A bit of Fantasy Painting .. AD&D Board Game Resin Figures (Ravenloft)

A spot of light relief from orders of battle with casts of thousands: :

A couple of pictures of a some figures painted out of a friend's board game, AD&D Ravenloft which he got for his kids. The first is a gargoyle primed in the Airfix (01) primer, then "dipped" in Vallejo Black Wash, not bad for a starting upgrade/alternative to the bare yellow resin as comes with the game (see below):  


I did the same for this "undead baby dragon" but while the kids played and we were watching Euro 16 on telly, I put a bit of two tone shading.

Painting notes (1): A middle colour of Vallejo Stonewall Grey, leaving the wash as the shade layer, and a light touch highlight layer by mixing in some Vallejo White to the Stonewall Grey. I darkened the gaps between the wings with more "black wash" thickened up with a drop of Vallejo Black.


Painting notes (2): Some spots of colour were the 'bone spine' Vallejo Desert Sand (I think) as a shade, Vallejo Bone White as a mid-colour and a touch of Vallejo Dead White as a highlight. A Vallejo Gory Red tongue highlighted with a touch of Vallejo Tentacle Pink. The final touch was a dab of Vallejo Golden Yellow on the tip of a cocktail stick dabbed into the eye socket.

They came from Outer Space (5): Space Crusade Mission 3 Counter-Attack

Responding to a desperate Ultra Marine plea the Blood Angels in turn requested a "return to Space Hulk" directive. The Umpire in a fit of generosity (Ed: Eh?) broke several Space Crusade Game Book rules and acquiesced "in the spirit of fair play" (Ed: A dubious wargaming concept"). The combined Blue and red teams promptly charged down the corridor in "do or die" fashion (see below):


The Red Sarge took out "Android 1" while a well place missile took out "Android 2" (Ed: Drat, oh I mean well played Space Marines!). With the passage through to the Ultra Marines 'docking clear' now clear the game seemed over .. until what is referred to as the "Bleeper Incident" took place, generated by the last Alien Event Card draw (see below):


The Bleeper Incident: The Red Sarge saluted the Blue Teams survivors and made to leave. The Blue Sarge made to return the gesture but stopped, his attention  was drawn to an ominous bleep from his scanner (an advanced piece of intelligence equipment the like of which not known to the more aggressive attack minded  Blood Angels). The two sergeants conferred, looked solemnly at each other, this much was seen from the live video feed back to the Mothership. Then accounts differ (Ed: Heresy some say), but one thing is for sure, the scanner was no longer functioning when the Space Marines returned to the Mothership. The official line was that a automated AI self-defence mechanism reactivated shot at The Ultra Marines Commander and luckily for the Ultra Marines the scanner took the blow. The Blood Angels Commander discharged his weapon and neutralised the threat. Faint residual traces of Chaos Dreadnought activity shortly after the Space Marine departed have not been confirmed and denied by the Space Marine Heresy Commissar. Bleeper Incident File now OFFICIALLY CLOSED .. Blood Angels and Ultra Marine survivors assigned to next HIGH INTENSITY COMBAT OPERATION.    

The Imperial Fist "kill count": 
A couple of cleaning Droids (advanced sweeping actions) and four Orcs/Kroots. A poor return for 100% casualty rate. New Squad assigned for operations.


The Ultra Marine "kill count": 
Six cleaning Droids, thirteen Orcs/Kroots, a Genestealer, two Chaos Space Marine/Tau and a Necron Android (possibly two)


The Blood Angels "kill count":
Seven Orcs/Kroots,one Genestealer, a Necron Android, three Chaos Space Marines


The Chaos "Cull of Space Marines":
Nine Space Marine Troopers and One Space Marine Commander


The Result:
The point total was close, the Lords of Chaos were please enough to promote the Chaos Commander but the Ultra Marines squeaked them at the end.

Winner: The Ultra Marines promoted to Lieutenant (2) 2 Orders 8 Equipment Cards
Chaos Promoted to rank of Chaos Warrior (3) 2 Event Cards
Blood Angels (1) 6 Equipment Cards
Imperial Fists (1) 4 Equipment Cards

Friday 1 July 2016

They came from Outer Space (4): Space Crusade Mission 3 Counter-Attack

The Imperial Fists Commander fell fighting heroically. A multitude of enemies blasted, hacked and stabbed at him. The deadly Genestealer monster licked its lips as it hauled the inert Space Marine Commander towards the depths of the Space Hulk (see below):


Genestealers were everywhere, lightning struct twice as another one appeared from the shadows and ambushed the Blood Angels felling an inattentive Space Marine Trooper (see below):


The surviving Space Marines seemed to be caught between a rock and a very hard place. Yellow  team had been wiped out, the Ultra Marines teetering at half strength and the Blood Angels had been "blooded". A dangerous Chaos pincer movement was developing. First things first, the ambushing Genestealer must be eliminated (see below):


The Ultra Marine Commander stepped up and took the Genestealer out (remember he was down to his last Hit Point). The Blood Angels seemed more intent in securing their "safe exit" to their 'docking claw', so much for team work. The Ultra Marines heavy weapons troopers calmly sited their weapons and awaited the storm. Auto-Cannon and Missile Launcher 'locked and loaded' let battle commence (see below):


The first "wave" was impressively scythed down thanks in the main part to the AI target selection of the auto-cannon. The deck was strewn with robot parts and Kroot limbs. The same fate befell the second wave (Ed: Pictures here are sadly missing, but the Chaos Commander was blubbing at the dice rolls), but the third struct hard and a deadly Necron Android got through and took out the Ultra Marine "Auto Cannon" Trooper (see below):

Note: The Blood Angels seemed to look on, ahem, does the camera ever lie?)


"Somehow," as in more by luck than planning, the Android was caught in a crossfire and taken down. The Red Team was half evacuated but the remaining Blue Team "duo" (Commander and Missile Launcher Trooper) had to fight its way through to their exit location, past two more Androids. A hard task!