Showing posts with label Modelling. Show all posts

Thursday, 4 June 2026

Undercoating some vehicles: [28mm. 1/56] M3 Lee, Tiger I and King Tiger

Making full use of the spray can to its last spluttering gasp I managed to cover three of my 28mm AFVs (see below, the US M3 Lee Warlord Games sprue sale bargain at £12, well worth waiting for): 


The mighty King Tiger (see below, I know it is totally overkill for Chain of Command but for £12 in the Warlord sprue sale I could not say no to my inner teenage school boys' "yearnings". It still is a beast!): 


Side by side you can see the "huge" difference in size, but remember their combat introduction/debut was but two years apart (see below, 1942 for the Lee, and 1944 for the Tiger II):  


Finally the spray-can's splutter finished in a timely fashion over the Tiger I (see below, again another steal from the Warlord games sprue salem guess what £12):  


I am please to say that the vivid green dries to a dull, dark, camouflaged dark green. 

Monday, 4 May 2026

Note to Self: 28mm Warlord Games US M3 Lee Assembly Instructions

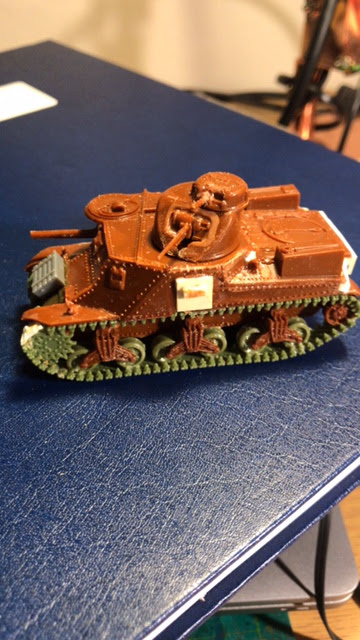
I am still wading through the Warlord Games AFV "sprue sale" bargains I picked up. I have to confess, despite my initial forebodings (post purchase click, "Did I need this?"), I am glad really I purchased this M3 Lee. It slotted together perfectly. which is a plus, as a very easy model build and the end product looks quite imposing. In fact it was far easier to build it in 28mm than the multiple Airfix and Hasegawa kits I have put together in 20mm (1/76 and 1/72  in old money). The M3 Lee is an intimidating beast despite its archaic sponson mounted 75mm howitzer (see below, in assembly you could be forgiven in thinking you were putting together a medieval castle): 


It suddenly comes together as a tank when the top is placed on (see below, the M3 Lee 90% there, or there until an 88mm gets the Lee in its sights): 


Complete with radio aerial (and like the Tiger I model I wonder how long the radio aerial is going to last) and a few more fiddly bits - front and rear lights, handrails (see below, the finished "monster", possibly for its crew survival potential rather than fighting ferocity, although a 75mm high explosive shell is highly respected by infantry and anti-tank crews on the Tunisian battlefield): 


Primed in The Colour Forges (Renegade Green) as a primer (see below, using this colour also as a shade colour, with a Vallejo dipping wash to follow in teh recesses, then a new set of greens [Olive Drab and highlights] should lighten its appearance up): 
 

Although "cheap" by buying a loose sprue these online assembly instructions from Warlord Games saved me from stupid errors. Despite the cleaness of the build I had to make study of these, particularly in reference to the turret build and the M3 Lee commanders hatch (see below, Warlord Games M3 Lee Assembly Instructions link): 


Another interesting Blog post comparing the plastic kit version (much better IMHO) versus the old resin version!

Saturday, 2 May 2026

Another Fairey Battle 1/72

My fascination with the Fairey Battle aeroplane continues. I came across another manufacturer (Special Hobby) that did a "Battle of France" Fairey Battle in my loval hobby shop. In conversation with a friend I was informed that the Airfix Fairey Battle was a little inaccurate. Instead of technical design drawings the Airfix model designers apparently were given a Painting guide (based on a modified Hurricane diagram) rather than the true technical drawings, This was a simple admin error, but as a consequence the tail and wing areas are too small (see below, I need to make this kit and do a compare and contract):   


Watch this space!

Post Script: When I see a cheaper copy (than £40 - Kindle could be an option) I will but this book (see below). I managed to flick through a reference library copy. It is a reassessment of the potential of the Fairey Battle. It claims it was more strategically/operationally mishandled rather than being an implicitly bad design.


Note: More successful designs had "two engines" - it seems that it was being asked to perform too much with too little horse power, with too big a crew (three)!

Friday, 1 May 2026

Big Man Spotted in Small Tiger II Turret

Hats off to Trebian for spotting this anomaly - from the same manufacturer (I think Tamiya, via Warlord Games) totally different scales of Panzer Commander - both of which are supposed to be representing a 28mm scaled figure (see below, the Tiger I Commander [on the right] seems to be the correct scale, whereas the Tiger II Commander [on the left] is a bit to much of a "big boy" and would really struggle to slip in and out the turret without being "greased-up"):  


I removed the "big chap" from the Tiger II and just "closed up" the tank for action! Problem solved!

Postscript: Excuse the blurry picture below - but he even looks big to other (Allied) tank commander figures from other Warlord kits (see below - and and superman?): 


It shows more clearly when you click and expand the photograph.

Wednesday, 29 April 2026

Note to Self: Tamiya/Warlord Games 28mm King Tiger Assembly Instructions Link

The "big cat" beast - the German King Tiger tank (see below, another "why on earth not" Warlord Games "sprue sale" purchase):


Although  a relatively simple build - instructions help (see link below): 

https://www.chaosbunker.de/en/2018/07/23/review-bolt-action-king-tiger-with-zimmerit-plastic-kit/

Tuesday, 28 April 2026

Note To Self: Tamiya/Warlord Games 28mm Tiger I Assembly Instructions Link


Warlord Games 28mm Tiger I purchased in their annual/seasonal "sprue sale" (see above and below - please note cute but fragile aerial on engine deck that won't last long!):


Useful link to Assembly Instructions (see link below): 


It is a relatively simple kit but these instructions helped me from making "sad" simple errors that all modellers live to regret, I think the kit is originally the Tamiya 1/56 one. Nice clean lines and an easy assembly. Recommended, certainly in the "sprue only" sale at half the retail price of the boxed version! Better for the planet too - less packaging *he said grasping at straws").

Tuesday, 24 February 2026

Been making some 28mm Kits

For my Chain of Command 28mm British Infantry the welcome sight of a Sherman Mk I (see below, the ubiquitous Western Front armour support): 


She came up nicely, less parts in 28mm than most 20mm kits (see below, looking ship shape and ready for battle): 


Keeping with the 1944 theme, my Crusader originally bought as a Western Desert AFV had a course change and became a AA D-Day+ addition to the British Armour inventory (see below, the Crusader had an extended career with the various specialist functions it found itself in): 


The Western Desert armour support was provided by the Valentine Mk II/III variant (another nice Rubicon kit). I did briefly toy with the idea of a Soviet version but decided that could wait for a 6pdr later variant (see below, 2pdr and 3 inch turret options shown):  


Assembly of 28mm kits is faster than 20mm! Painting might take longer though!

Sunday, 14 September 2025

Airfix - F35B Lightning II

Something modern, the F35B Lightning II - RAF/RN flying off the Queen Elizabeth or Prince of Wales aircraft carriers (see below, the plastic has been put together, next grey paint scheme): 


It was a bit of a strange modelling experience as you can see that there is such technical complexity in the airframe, there is intricate detailing, but most of the tech stuff is hidden inside a smooth stealth anti-radar shape! 

Thursday, 11 September 2025

Fokker D XXI Progress - Assembled

Hitting the ground running as the PM 2 model was a neat and quick assembly (see below, few parts and a plastic that takes well to ploy cement, it posed no problems going together):  


I have chosen to go for the Dutch version, but will either have to freehand or source some decals (bizarrely the kit came with Czechoslovakian instead of Dutch ones). Base coat needed first.

Wednesday, 10 September 2025

Late Birthday Present to Myself - 1/72 Fokker D-XXI (PM Model)

It is rude to go into a model shop and not buy something. I had to look hard but I chose this for jut under £9 (see below, an interesting early flying machine that did not survive its contact with the Luftwaffe [in Dutch and Danish service] but lasted longer in service with the Finnish Air Force fighting the Soviet Union): 


I am tempted to do it in Finnish colours but my 1/72 Dutch army will miss it! NoteL In which case I will need the Dutch Orange Triangle war markings!  

Wednesday, 4 December 2024

Bucket List Project: Fletcher Pratt 1:600(ish) game of The Battle of the River Plate [Model Collection] HMS Achilles

This is a long standing project of mine, ignorant to the disrespectful advice on how silly and large a scale it is to play it in. True to Airfix 1970's childhood fashion, three plastic cruiser kits versus a pocket battleship kit .. recreating "The Battle of the River Plate" (see below, the final ship model for the collection, an Airfix HMS Ajax which has to be converted to its Leander class sister HMS Achilles .. which I believe is to do with the positioning of the AA battery? I will find out as I thinks there is an online copy of an Airfix magazine I need to read .. as I am not the first wanting to do this):   


The rules I intend to (first) use are Fletcher Pratt .. then we will see where that takes me. With this purchase I now have:
  • HMS Ajax (Airfix 1:600) 
  • HMS Exeter (Waterline 1:700 or an Old Russian 1:500 kits)
  • HMS Achilles (Airfix 1:600 conversion)
  • KM Admiral Graf Spee (Airfix 1:600 or Waterline 1:700 KM Deutschland)
Lets see how long it tales me to make and paint them. 

Update: 

From Bankinista, many thanks: Airfix Magazine Nov 1965 has an article on converting the Ajax kit to the Achilles at the time of the River Plate:
https://www.davecov.org/modelling/refer ... rsions.pdf

Friday, 25 October 2024

De Havilland Vampire Video!

Hmm, just prowling the internet and You Tube and this came up after an unrelated video .. (see below, the previous video was the final battle scene in the film Gladiator, so don't ask what bizarre connection the AI came up with to prompt me with this): 

https://www.youtube.com/watch?v=EWgd9yj-cJ4

Looks like a modelling project has list been born, as I am pretty sure I have one of these in an old Airfix kit in the loft (see below, one I didn't do in my youth as I was only interested in WW2 propeller planes):

Model on!

Sunday, 2 June 2024

1:72 Pegasus Hobbies - Pz 38(t)

Two in a box is a very appealing selling point for the wargamer. Two Pz 38(t)'s would also nicely flesh out and complete my early WWII Panzer Battalion (as per Command Decision OrBat). Small little things with a few parts (so it is not an exercise in fiddly modelling, gets the thumbs up from me - especially teh all in one track. One small 'ouch' moment though, in fitting the track to body of the tank there is a sharp "snap" from the track, as it broke cleanly in two. Something had to give as the track was warped in a concave fashion and had to be bent back to fit correctly. Thankfully the resulting small gap was easily bridged with "a small slither of plastic-card" (see below, in its "gap state", construction was therefore a little more exciting than I wanted as this happened four times, once for each side of track):  


Despite that it was a very nice quick build but with a detailed model (see below, the first one finished - commanders cover chosen to be open): 


Two tanks completed, turret hatches open awaiting "commanders" - with a small fleck of white denoting the plastic-card track repair (see below, once the first tank was done, then the second one was much faster): 


Searching around in the spares box for some German Commanders and I found two Plastic Soldier Company (PSC) ones that looked early war(ish) and they were shaved/sculpted to fit into the turret, which meant "breaking arms - the reangling then", sounds much more complicated and brutal than it actually was. It amounted taking a small triangular wedge out of one part of the arm/shoulder and then adding it to another part): 


Undercoating and painting next (tbc when though). At least the "to be assembled pile" is one box smaller.

Saturday, 2 September 2023

28mm Greeks for Mortal Gods - Reminder to self (Kick Start This)

These are the Victrix plastic 28mm Greeks that came with the Mortal Gods game (purchased a while back) ... and they are good figures that need some TLC (see below, a pack's worth or hoplite mercenaries - for hire to the best bidder, good value "in plastic"):


The poses are good and warlike with plenty of character(see below, we are in the age of the plastic pack of forty, taking over from metal dozen for the same price - but does that mean mass resin is to follow?):


I am going to resist the temptation to DB'X' them on a base of four [as those games seem to be on the way "out"], but retain them as colourful individuals that can be hoarded together into an appropriate fighting mass): 

he

More [Greek assembly] to follow, my ultimate aim is to get three figures worth of figures on the table .. but maybe not this year! 

Saturday, 29 July 2023

Painting 1/200 Me 109s (Warlord Games - Blood Red Skies) - The Luftwaffe Ready Room

Seeking painting inspiration I toured the internet for videos on how to paint WWII German Luftwaffe Me 109s circa 1940:

https://www.youtube.com/watch?v=A4V6BQo8tyQ

https://www.google.com/search?q=blood+red+skies+1%2F200+me-109+painting+guide&rlz=1C1JZAP_enGB834GB834&sxsrf=APwXEdfZY4A5444DZzh2nGo8DTEftsbQ5A%3A1686928428885&ei=LHyMZNS1NfiThbIPzOC7yAQ&ved=0ahUKEwjU-46Oisj_AhX4SUEAHUzwDkkQ4dUDCA8&uact=5&oq=blood+red+skies+1%2F200+me-109+painting+guide&gs_lcp=Cgxnd3Mtd2l6LXNlcnAQAzIFCAAQogQyBQgAEKIEOggIABCiBBCwA0oECEEYAVCZDViaKmDnK2gBcAB4AIABhwGIAcwNkgEENC4xMpgBAKABAcABAcgBBA&sclient=gws-wiz-serp#fpstate=ive&vld=cid:ea18ff39,vid:Pbopp8mOSeA

http://www.dogfighter.com/Messerschmitt-Me-Bf-109-E-3/0344.html

My final recipe was as follows: 

  • Airfix/Humbrol Acrylic Primer
  • Vallejo Black Wash (to highlight detail) 
  • Light Blue (Base) Airfix/Humbrol Acrylic
  • Vallejo Model (Base) Dark Grey
  • Vallejo Model (Base) Light Grey
  • Vallejo Game Colour Bone White foundation for (Base) Yellow area on nose
  • Vallejo Game Colour (Base) Golden Yellow
  • Vallejo Brown Ink 
  • Vallejo Game Colour (Highlight) Yellow (see below, half way through): 
  • Vallejo Yellow Ink
  • Final Vallejo Game Colour Yellow (Highlight) 
  • Smoke Wash
  • Vallejo Black on Canopy
  • Vallejo Model Colour German Grey on Propeller
  • Vallejo Model Colour Black Propeller
  • (Highlight) Dark Grey including canopy struts 
  • (Highlight) Light Grey including canopy struts 
  • (Highlight) Light Blue
  • Micro Sol preparation of decal area 
  • Decals: Warlord Games Decal Pack - 1/200 JG-26 using Micro Sol (see below): 
  • Micro Set
  • Humbrol Satin Varnish
The end result (see below): 


Off to play Blood Red Skies next Battle of France 1940!

Wednesday, 22 March 2023

Airfix 1/72 Airborne and Willy's Jeeps

It goes without saying that you can never have too many jeeps in a WW2 Western US or British Allied army. Hence the unmade box of plastics spilled forth four more jeeps to be made, three of which were the new Airfix Airborne type and one a Willy's [ex-Heller] recon type (see below, the Heller kit was missing the lower chassis part so a clever bit of plastic card substitution, if I do say so myself, was introduced): 


I suppose the airborne jeeps can also double as SAS jeeps in Western Europe 44-45 as well. The impressive bit about the new Airfix kits is the range of MGs you can add to them, as well as the extremely useful 75mm pack howitzer (see below, which pretty much pads out my immediate need for any more allied utility vehicles): 


It was a nice general build.

Monday, 6 March 2023

Airfix Lee/Grant scrapped together from a Donation and bits from the Scrap Box.

The different coloured pieces of plastic tells the sorry tale in itself. This "baby" Grant Tank on the right comes from multiple parents .. at least one brown/orange, one yellow and one green Airfix Lee/Grant kit (plus some hobby store plastic-card, a curved front from what I think was a M36 Jackson, "Sherman(?)" rollers and a PSC storage box to cover a bodged hull to chassis seam). A Frankenstein of sorts or patchwork quilt, but rather than a sad model discarded to the bin, it has a new least of life. I also loved the "edge of your seat" challenge in the making of it (see below, in its front facing Grant guise):  


The rear shot shows the white plastic-card surfaces where the composite spare parts-did not quite stretch or cover enough (see below, though it has to be said working with "old brittle plastic" from the 1970's or 1980's is a curse as it had a tendency to crumble or splinter under pressure - this was a peculiar challenge for me as I had to first disassemble the previous attempt at building it [basically a carcass] and reassemble it [from a haphazard trapezoid to a more regular rectangular cross section]): 


The Lee part of the tale is just a turret swap as it shares the hull, so with a newly completed Lee turret you have the option of two types of tank (see below, the Lee turret was taken from the "original" orange/brown plastic kit - where the majority of the pieces for this kit came from - again care being taken with its brittleness as the Lee turret has some fiddly MG parts): 


Just remembered: The final note is that the "green" track came from the "spare" (as in the more detailed track option) in the new Airfix Sherman Firefly kit I have already made. There you go, I have one more tank to fight the Axis with. It also just shows you the usefulness of keeping a spares box (or two).  

Tuesday, 28 February 2023

Desert Air: RAF Curtiss Tomahawk IIB

I have been listening to James Holland's War in the West, Volume II recently (not quite finished it yet, as it is a very long audible listen), but one of the things it really emphasised was the importance of the allied Desert Air Force in fighting the DAK. Alongside the Hurricane Mk II tank strafer was the ubiquitous American made Tomahawk (see below, the "shark's teeth" epitomised the gruff ground attack ability to destroy the Axis supply lines and bomb it's armour, a war winning contribution): 


So I am looking forward to making this, plus I class it as another bucket list build, one that I regret not making as a kid! Or rather small kid, as I am still a kid, just a big kid. 

Sunday, 19 February 2023

British Army Chieftain and Berlin Camo Reference Material

Another Airfix build from the loft, this time a Cold War veteran, the BOAR Chieftain or rather a second to keep an earlier Chieftain build company (see below, it was an old kit in the hard plastic [cover picture showing a finished model as opposed to the "crossing the rugged field" artwork - so it was pretty old] and dangerously brittle tracks): 


Thinking of the Berlin garrison with its unique urban camo (see below, nothing like setting yourself a challenge): 


Well I had me some fun running around the Internet seeing various sources and takes on the Berlin Camo pattern: 


Watch this space for the painting description (eventually), but I think it will be a slow process.

Saturday, 18 February 2023

Airfix's "Boomerang Bob" Fighter - A Bucket List Build

I eagerly awaited the 2022 "Vintage" re-release of the Australian WWII "Panic Fighter" (the real thing was made from spare parts from aircraft available indigenous in Australia in 1942) as I remember "seeing it" as a kid in the Airfix Catalogue, wondering about it, but never going about getting it. There was always something more 'sexy' with crosses on it that took preference. A bit like the Fairey Battle and Brewster Buffalo, a missed childhood opportunity (see below, the CA-13 with original box art in all its glory, I bought it direct from Airfix when I picked up some resin buildings in their end of year sale):   


All things said it is not a particularly complicated build, not many parts but I took time as I was in no particular rush (see below, it came together quite nicely):  


If there was a scary part about building the Boomerang it was the canopy as it comes in three parts, the main bubble and two 'sliding' side parts (see below, I took time to make sure things fit well, the inside needed painting before the messy "Clearfix" came into use later):   


The decals were very sexy, the Australian RAAF Pacific version of the RAF roundel, with the red bit missing as "anything with a bit of red in it, got a lot of Allied AA fire" regardless of what it actually was. All the Allied countries discovered the universal itchy AA trigger finger of their AA gunners to their own cost (see below, something satisfyingly distinctive with the missing red that says Pacific War we are fighting the Japanese):  


Primed Airfix Acrylic Grey (see below, you may need to do a double take to spot any difference, but trust me there is a layer of grey paint there): 


Because it is the way I do things now, the whole model got a Vallejo Dipping Sepia Brown wash coat (see below, the brown and green colour scheme seemed to lend itself to brown rather than black for leaving the detail "lined in" after putting on the base colour, I guess it is all about "painting less" rather than more):  


Bottoms up, underside first. I wanted to use as close as I could to the original Airfix/Humbrol paint scheme and as luck had it I had Humbrol 65 (Matt Aircraft Blue) in a little penny packet paint pot from another "starter kit" which saved me a trip to the model shop (see below, the brown wash seems to be working nicely for the dark detail):  


Starting the topside camouflage, first the brown (see below, note this is where I had to use the paint matcher site which said Tamiya XF-52 Matt Earth [4.5 stars match] equates to Humbrol Acrylic 98 Matt Chocolate): 

https://www.modelshade.com/paint-conversion-chart/humbrol/241


Next the camo green part to complement the brown (see below, Humbrol Acrylic 149 Matt Dark Green gets matched to Vallejo Model 70.894 [4.0 stars but also a bit of confusion here, as the site matcher calls this Camo Olive Green - but my bottle says Russian Green, so I went with my 894 bottle anyway]): 


Next: The white tail (Humbrol Acrylic 34) and black (Humbrol Acrylic 33) propeller - note the tips of the propeller were not painted black, but were left lighter to help the yellow paint stand out better, Alos the flight jacket was given a Vallejo Leather Brown base coat (see below, the little bits count as much as the big bits - I think I have also given the pilot some flat flesh on his face and hands too): 


Next a highlight to the brown by mixing in a little yellow, plus the tips of the propeller are painted yellow (see below, I just wanted it to look a little blocky and weather worn over the panelling): 


Similar yellow mixed with the green for another blocky highlight, I also give the pilot a highlight on his leather flying suit (see below, at this point I think the paint job is starting to come together nicely): 


The tail gets a final white highlight which is just another coat of paint giving it depth to the prominent places, and neglecting the recesses, touching up with a brown wash. The cockpit glass is put into place using ClearFix - my least favourite Humbrol product as I find it very messy and stringy and I am odds to get it in the right places, even carefully dabbing it on with a cocktail stick (see below, fixed in place I leave it to set overnight): 


Fixed in place the plexiglass gets blacklined (see below, by this point I am almost exhausted painting, so I go slow and carefully, absolutely no rushing):  


From black to camo green and then a subtle highlight (see below, begging for the Australian decals to bring it to life):


The decals really make it look the part. However there is a sorry tale to tell here. As the Humbrol product I used, DecalFix reacted badly with the Tamiya and Vallejo paints, as in it stripped them away beautifully .. sadness gripped my heart. Now to worry I carried on and let the decals fix, then when all "well and truly dry" I painted round decals as best I could (see below, I think I got away with it; interestingly the subject of DecalFix melting Tamiya paints is well covered on the forums - I subsequently found out):  


The underside, the only thing to add is the fact that I highlighted the Humbrol Aircraft Blue 65, with a Revel Aqua Colour, Sky Blue, then adding a touch of white for a subtle highlight of a highlight in places that just caught the eye (see below, tickle that tummy, which has a bulbous camera housing in it, dead centre): 


The final act is a matte varnish (see below, Humbrol Matt Cote): 


Bucket list item .. "Done" and I am very proud of it.