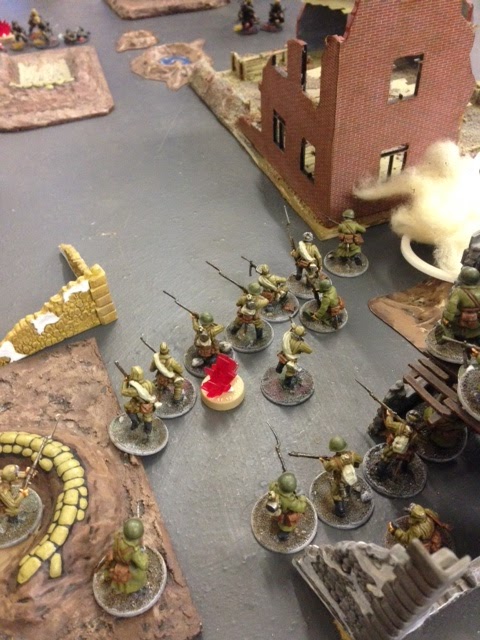
I was without camera for my last game Chain of Command in the Stalingrad saga so instead of the usual chronological sequence of photos perhaps I can convey a sense of what happened ...
The sudden alarm convulsed "The Captain", he spat the sweet liquorice tea into the fire and stumbled forwards in a half daze waking from his reverie. The evil hiss of the fire, the sweet vapour of the tea and the deadening sense of urgency left a surreal feeling to his thought processes. He knew he was undone, his sentries had been lax and posted in the wrong place. The Germans had infiltrated into the very heart of his position and at this very moment were heading towards the banks of the Volga. The precious crossing points! The action was over before he had begun. To retreat was the only sensible option, but the cold logic of the day was simple. There was no place to retreat to. Out thought and out gunned they would still nevertheless have to attack with what they had to hand and it would be suicide. But so be it, that was the price to be paid and the Devil was doing the asking.
"The Captain" got to a vantage point. Already the dark figures, that unmistakable silhouette of the German Landser, were running down his left flank. All he could do was charge at them in whatever formation he could muster with whatever he could lay his hands on and hope to take some of them with them. Katya would not see him again. It would end here today he knew it. At this moment he knew he was already lost but the pain and indignation of being out thought by Fritz hurt the most. He pulled on this feeling of outrage and with a fire in his belly called "Hurrah" , raising his pistol defiantly skyward. The Siberian hat nearly fell from his head (not the photographic moment of Communist propaganda), he laughed maniacally. He ran and cared for nothing as the deadly buzzing of the bullets passed by, a German MG from the wreck of the Heinkel.
The Soviets caught "them" by surprise, as once they had past the Russian positions direct "line of sight" they thought they were safe. They relaxed. No one in their right mind would dare run across open ground covered by German MG42s. They laughed. This was a piece of cake, their easiest day in Stalingrad. They were the 'crack' ones and had caught the Russians with their pants down. They must have been facing kids, novices, amateurs. Then the expression of horror and shock was stuck on their faces, caught in a frozen moment of time as the blood curdling sounds of the Soviets swarming from all around them overwhelmed their senses. The horror erupted, bodies tumbled, men fell, in seconds two squads vanished. One Soviet, one German. The survivors clinging to rat holes and dead spots. The other 'baseline' Germans were also in shock. Their crack squad was gone. The Soviets simply had ran through the MG zone, the crew had fired high, caught a few but not enough. Things like that were not supposed to happen. It broke the rules. The Soviets are madmen!
Another German squad now had to run the gauntlet. Again, "Raus" and the Landsers came on. This time in the open Landsers fell, but they reached the house, but from the rat holes the Russian emerged and sniped, and hacked, and shot, and threw grenades\and then threw rocks. The path to the Volga was a trail of grey German corpses. Again the attack hung on the wire. Then as it happened, a nameless German NCO moved from the back, a veteran of Poland, of France of the early Russian Campaign. He saw and knew what had to be done. He ran with his section, gathered the other shocked and pinned Landsers together, rallied them, reduced their shock and pushed them forwards with curses to the Volga. His eyes were cold. The pitiful few Soviets remaining hurled curses. All was unwound, left with but a few rounds of ammunition they could only but watch. They had taken a pound of flesh from the Germans put two had been taken from them in return. They were bled white. "The Captain" turned to speak. As he turned the grenade exploded in front of him. He had fought hard, he had fought with mad valour but now he was helpless as he was lifted bodily into the air and knocked senseless. Grey shapes followed in after the explosion. They poked and prodded his body, searched him - were disgusted by his wretched smell. His final bullet would come another day, for today was his first day as a PoW, the Germans dragged him away. The interrogation would follow but The Germans needed to push forwards, one more house, one more street, they could hear the sound of the Volga. Was it their imagination or could they hear new waves of Russians, splashing ashore, their feet still wet from the crossing.
One more battle to come ... Ivan was waiting. Ivan was always waiting.
The ongoing adventures of a boy who never grew out of making and playing with plastic model kits (and even some metal ones too). Also a wargamer in search of the perfect set of wargaming rules for WWII Land and 20th Century Naval campaigns.
Showing posts with label wargame campaign. Show all posts
Friday, 29 March 2019
Sunday, 6 January 2019
"Nero" Board Game
Over Xmas I picked up a copy of this interesting board game called Nero (or rather post Emperor Nero mess with four warring Roman factions) in "The Works" shop for a tenner. It looks a simple enough game in itself to play but the contents seem to be perfect to set up as a campaign system for a Early Imperial Roman "Civil War" (DBA?) campaign. Not sure if this will be feasible with my 15mm Roman collection or serve as the inspiration I need to paint up my 28mm plastics gathering dust in a box in the loft (see below):
This was the first of two games I saw (and acquired), the other (Latin) has a much wider timescale and looks far more complex (hundreds of counters) - more of that later!
Might even be a case of getting some 6mm Roman armies ;)
This was the first of two games I saw (and acquired), the other (Latin) has a much wider timescale and looks far more complex (hundreds of counters) - more of that later!
Might even be a case of getting some 6mm Roman armies ;)
Labels:
Boardgame,
Early Imperial Roman,
Nero,
roman,
The Works,
wargame campaign
Sunday, 6 May 2018
Stalingrad Play Test: Chain of Command (P4)
Several kills and a massive amount of shock "routs" the advanced (or should I say over advanced, aka "out on a limb") off the board. Lesson learned .. short-term gain can be long term pain. Still the Russian and German Force Morales have now levelled off. One thing about well-lead armies with lots of officers, there is plenty for the troops to think about when they start dropping like flies (see below, the Stalingrad "lost squad" memorial, just missing the empty MG42 ammunition casings):
Nevertheless, if at first you don't succeed; try, try again! Another Soviet Squad emerges from the shattered timbers of "Pink Penguin House" utilising the ubiquitous 'smoke grenade' to cover itself from flanking fire (see below):
This time the large empty building is there target. The Russian Squad takes the Senior Leader with them to assist in extra activation commands. He also brings along his support weapon, the flamethrower, something I am itching to use in anger. Even the mention of the word causes a certain amount of disquiet and mutterings in the German ranks. There was some talk of 'leaving the flamethrower off-table as the perfect Russian 'ambush' to defend their exposed jump-off points" (more of that later). At this point both sides were approaching acquisition of their first "Chain of Command Dice" (see below):
Von Paul decided to take the "fools gold" on my right flank. An undefended Russian Jump-Off point. Taking that would trigger a "bad thing happening" Force Morale roll. Dutifully a German Rifle Team moved up to almost overrun (just a little bit of slowing terrain stopped them). This allowed the Russian to (at the third attempt - because with their Senior Leader off table it is 50-50 if the team/squad comes on) deploy. As the Germans are so close, they deploy into a bitter life and death "close combat" with the German Rifle Team. This is a real pity for the Germans have two MG42s on overwatch across the other side of "Heroes Square". The Soviets have the numbers and try to stoke up the odds with a couple of hand grenades but alas they miss and it goes straight to the point of the bayonet (see below):
The German Rifle Team is massacred in the hand-to-hand fighting but before loud songs of jubilation can be started on the Russian side, in taking the German position they find themselves embroiled in a second even deadlier "close combat". This time it is but a small MG42 team that had been powerless to help their fellow rifles because of the close intermingling of bodies. Only three men but they are in "hard cover". The factors are tallied up and both sides will throw lots of dice. The Germans are harder targets (being in hard cover) but the Russians are in the "open street" (see below):
Good German dice and poor Russian dice means that it is the Soviet Squad that is now massacred and a wounded officer left staggering back to the Command Post (to my utter disbelief and astonishment ... argh) and the Germans are barely scratched - statistically it should have been mutual annihilation. That my friends is Stalingrad close quarter fighting turning seemingly on a whim of fate, brutal and attrition. The Force Morale drops for both sides but not sufficient to break either side yet. The game has to be called for the night a brutal draw with the Germans in a slight lead body wise but the flamethrower is being brought up to "torch" something. The Germans only have 'one' Rifle Team active but 'six' (count them) MG42s active. Defensively they are very strong, but small three man MG teams have to be careful if they advance forward. The German Senior Leader is now controlling the baseline Squad's surviving two MG42 teams on the right German flank so it will be hard for him to help push forwards. The Russians have two active Squads in the middle with that 'interesting' support weapon poised to discharge (see below, the last I saw of my fourth Squad before the MG42 gave off a death rattle):
For me it was a night of hard lessons learned and missed opportunities. Deploying your forces early is so tempting but the powerful Germans seemed to be prematurely fixed. If they had thrown caution to the wind the German Patrol could have overrun two of the Russian Jump-Off points. However I was not without fault, a German Rifle Team for a Russian Full Squad is probably a bad trade. It was also pointed out to me afterwards the Soviets had missed a golden opportunity. If the Russian Flamethrower had been kept back it would have been in a perfect place to "Ambush" (Chain of Command style) the German Rifle team out in the open, albeit as they tried to get away they would have had to run the gauntlet of the overwatch German MG42 teams. I think I now appreciate the potential power of the Chain of Command dice. Likewise "keeping a reserve" is a must.
The Stalingrad Campaign awaits ...
Nevertheless, if at first you don't succeed; try, try again! Another Soviet Squad emerges from the shattered timbers of "Pink Penguin House" utilising the ubiquitous 'smoke grenade' to cover itself from flanking fire (see below):
This time the large empty building is there target. The Russian Squad takes the Senior Leader with them to assist in extra activation commands. He also brings along his support weapon, the flamethrower, something I am itching to use in anger. Even the mention of the word causes a certain amount of disquiet and mutterings in the German ranks. There was some talk of 'leaving the flamethrower off-table as the perfect Russian 'ambush' to defend their exposed jump-off points" (more of that later). At this point both sides were approaching acquisition of their first "Chain of Command Dice" (see below):
Von Paul decided to take the "fools gold" on my right flank. An undefended Russian Jump-Off point. Taking that would trigger a "bad thing happening" Force Morale roll. Dutifully a German Rifle Team moved up to almost overrun (just a little bit of slowing terrain stopped them). This allowed the Russian to (at the third attempt - because with their Senior Leader off table it is 50-50 if the team/squad comes on) deploy. As the Germans are so close, they deploy into a bitter life and death "close combat" with the German Rifle Team. This is a real pity for the Germans have two MG42s on overwatch across the other side of "Heroes Square". The Soviets have the numbers and try to stoke up the odds with a couple of hand grenades but alas they miss and it goes straight to the point of the bayonet (see below):
The German Rifle Team is massacred in the hand-to-hand fighting but before loud songs of jubilation can be started on the Russian side, in taking the German position they find themselves embroiled in a second even deadlier "close combat". This time it is but a small MG42 team that had been powerless to help their fellow rifles because of the close intermingling of bodies. Only three men but they are in "hard cover". The factors are tallied up and both sides will throw lots of dice. The Germans are harder targets (being in hard cover) but the Russians are in the "open street" (see below):
Good German dice and poor Russian dice means that it is the Soviet Squad that is now massacred and a wounded officer left staggering back to the Command Post (to my utter disbelief and astonishment ... argh) and the Germans are barely scratched - statistically it should have been mutual annihilation. That my friends is Stalingrad close quarter fighting turning seemingly on a whim of fate, brutal and attrition. The Force Morale drops for both sides but not sufficient to break either side yet. The game has to be called for the night a brutal draw with the Germans in a slight lead body wise but the flamethrower is being brought up to "torch" something. The Germans only have 'one' Rifle Team active but 'six' (count them) MG42s active. Defensively they are very strong, but small three man MG teams have to be careful if they advance forward. The German Senior Leader is now controlling the baseline Squad's surviving two MG42 teams on the right German flank so it will be hard for him to help push forwards. The Russians have two active Squads in the middle with that 'interesting' support weapon poised to discharge (see below, the last I saw of my fourth Squad before the MG42 gave off a death rattle):
For me it was a night of hard lessons learned and missed opportunities. Deploying your forces early is so tempting but the powerful Germans seemed to be prematurely fixed. If they had thrown caution to the wind the German Patrol could have overrun two of the Russian Jump-Off points. However I was not without fault, a German Rifle Team for a Russian Full Squad is probably a bad trade. It was also pointed out to me afterwards the Soviets had missed a golden opportunity. If the Russian Flamethrower had been kept back it would have been in a perfect place to "Ambush" (Chain of Command style) the German Rifle team out in the open, albeit as they tried to get away they would have had to run the gauntlet of the overwatch German MG42 teams. I think I now appreciate the potential power of the Chain of Command dice. Likewise "keeping a reserve" is a must.
The Stalingrad Campaign awaits ...
Saturday, 5 May 2018
Stalingrad Play Test: Chain of Command (P3)
The Soviets deployed to the Germans right, stacking two full squads against a rifle team. True there was a bit of harassing fire from across the square but the designated assault squad was covered by a smoke grenade. The squad in "Pink Penguin House" laid down covering fire as their comrades advanced (see below):
The result if this was "no kills" but shock placed on the targeted German rifle team (see below):
The Germans were content to move there MG42's around to get better positions and laying down speculative fire which caused a few casualties in "Pink Penguin House" and shock on the assault squad (see below):
Then came the interesting bit as the in next Russian phase they throw two sixes in their Command Dice so I know I am getting a flip-flop. More covering fire is laid down as the assault squad "does a dash" (3d6 inches - sustaining a shock for the disorder caused). If they throw well they are in close combat range for the Russian flip-flop (see below):
Looking promising, a roll of seven or more on three dice should see them in. Von Paul looks on helplessly as none of his precious MG42s are on 'overwatch' (see below):
The assault goes in, with grenades been thrown by the Soviet to add insult to injury. I now get to see and feel my first Chain of Command "close combat". Something I think I should get used to for the Stalingrad Campaign battles (see below):
The results are brutal for the Germans as they lose a team (morale roll for a 'bad thing' happening and a Junior Leader, another morale roll for [another] 'bad thing' happening). However in consolidating the ground I now see myself as the focus of attention for three MG42 teams and it is the Germans to go next! This could be a rather fleeting Phyrric victory (see below):
Rather than being unnerved, Von Paul seemed rather keen and eager to exact his revenge on the overstretched Soviets directly in his sights!
The result if this was "no kills" but shock placed on the targeted German rifle team (see below):
The Germans were content to move there MG42's around to get better positions and laying down speculative fire which caused a few casualties in "Pink Penguin House" and shock on the assault squad (see below):
Then came the interesting bit as the in next Russian phase they throw two sixes in their Command Dice so I know I am getting a flip-flop. More covering fire is laid down as the assault squad "does a dash" (3d6 inches - sustaining a shock for the disorder caused). If they throw well they are in close combat range for the Russian flip-flop (see below):
Looking promising, a roll of seven or more on three dice should see them in. Von Paul looks on helplessly as none of his precious MG42s are on 'overwatch' (see below):
The assault goes in, with grenades been thrown by the Soviet to add insult to injury. I now get to see and feel my first Chain of Command "close combat". Something I think I should get used to for the Stalingrad Campaign battles (see below):
The results are brutal for the Germans as they lose a team (morale roll for a 'bad thing' happening and a Junior Leader, another morale roll for [another] 'bad thing' happening). However in consolidating the ground I now see myself as the focus of attention for three MG42 teams and it is the Germans to go next! This could be a rather fleeting Phyrric victory (see below):
Rather than being unnerved, Von Paul seemed rather keen and eager to exact his revenge on the overstretched Soviets directly in his sights!
Friday, 4 May 2018
Stalingrad Play Test: Chain of Command (P2)
My Soviet heroes are a basic WWII Russian Infantry Platoon, detailed courtesy of the Too Fat Lardies Russian OoB supplement; basically by this time in the war the numbers of "rifles" were starting to thin down in each squad from 8-9 to 6-7, with the range dependant on if you include the spare rifle in the LMG team (see below, a 1942 Soviet Rifle Platoon with a smattering of supports I have to choose from. In the end I went for a 'dangerous' flamethrower team):
The Soviet "jump off points" are placed. All-in-all, I think my opponent Paul, or "Von Paul", out-foxed me as I seem rather squished in the middle with my right flank "hanging in the air"! This after all in a learning experience, "Welcome back to Chain of Command" - I better go read these rules again (see below):
I am rather worried about this nasty little advanced German jump-off marker. One of my key objectives seems to already be in enemy hands! Not good! (see below):
The Germans have a solid baseline building and an exposed bunker position on their right (my left). I don't think anybody will be brave or crazy enough to run across "Heroes Square" for fear of becoming a dead person - also I am still worried about my right flank (see below):
So annoyingly the Germans have outplayed me in the Patrol Phase and are positioned in an advantageous Jump Off position that weakens my right flank (I seem to be getting fixated on this, best stop it). Not only that, Von Paul gains the initiative and rolls a bevy of squad deployments. Which means he has a squad on each of his Jump-Off points. No quick wins here! I have a crescent of angry Germans facing me with MG42s hard cover. This prompts me to deploy to the left and concentrate on what I perceive to be the Germans one weak position. I deploy a squad into what I call from now on "Pink Penguin House" (see below)
This Russian Squad's target is the rifle section from one of Von Paul's "large" three-team German Pioneer Squads (one rifle section and two MG42 teams, it's Panzer Grenadier plus!). Thankfully they have "previous" battle casualties (Von Paul has chosen to take his Campaign 'Toon for a 'run-out' whereas I am going for a fresh Soviet Platoon just to get a handle on how the Soviets play) so they are a Landser down here and there, not that I noticed (see below, these rifles are deemed in "light cover" to are my best target):
Time now to set things off with a little bit of shooting. I am slightly disquieted at the thought I might not even get all of my troops on if Von Paul "gets the dice" and is aggressive. My Jump-Off points may be overrun before I know it! The Infantry Commander's mantra is after all "Am I being aggressive enough?"
Tuesday, 1 May 2018
Stalingrad Play Test: Chain of Command (P1)
The "ad-hoc" Stalingrad terrain. Here you see an empty (of troops) "Heroes Square". It was nice to see terrain bits (craters, ruined bunkers and entrenchments) dating back to 1994 when I was a wee slip of a lad in Aberdeen (see below, seen looking from the Russian trenches across the grey pavements):
Checking out the Russian left flank, the big building is an obvious go to point (see below):
The Russian right flank and again a "must have" big ruined building (see below):
So after the intense "symbol moving" of the Patrol Phase everything gets fixed in sort of place (see below):
Ready for the action to begin and assign the jump-off markers!
Saturday, 30 December 2017
Xmas Present Haul (Part 1) WW2 Soviet Infantry (Winter)
Egged on by a local club whose members are about to start a 28mm WWII Summer to Winter Stalingrad Campaign using the Chain of Command rule-set I hinted to my wife a nice new shiny box of toys might be needed. I dutifully walked away and "imagine my surprise" when Santa had left a special pressie (see below):
It took me a (tortuous) while before I could "open to touch and assemble" them as I first had to assemble a "stand alone [but for how long will it be left standing?]" child basketball hoop and then configure a couple of mobile phones (the devil's toy!) not to mention helping look for (as in Search and Rescue mission) "lost Lego parts"!
They look really nice (he says as he yet again descends into WWII multi-scale madness), watch this space fpor a progress report or two in the near future ;)
It took me a (tortuous) while before I could "open to touch and assemble" them as I first had to assemble a "stand alone [but for how long will it be left standing?]" child basketball hoop and then configure a couple of mobile phones (the devil's toy!) not to mention helping look for (as in Search and Rescue mission) "lost Lego parts"!
They look really nice (he says as he yet again descends into WWII multi-scale madness), watch this space fpor a progress report or two in the near future ;)
Sunday, 10 December 2017
Sci-Fi Project: The Yaeter (Part 4)
My first "Yeater Task Force" formed up (as per Star Gruntz army builder rules) into an "insertion formation" [150 points]. Twenty two bodies all told (see below: three basic six man squads [in a diagonal running down the photograph top left to bottom right], a two man command team [top middle] and a two man [sniper] asset [top right]):
Close up of the First Squad (see below, obviously laying down covering fire):
Close up of the Third Squad (see below, on "point"):
Seen from the perspective of the rear "Command Position" (see below):
Overall I am quite please with how they have come out :)
Note to self: I still have another fifteen figures to finish off (in the same painting style methinks), but the above force is supposed to be dropped from a heavy transport (photo to follow in another post) and is "all" that is needed for my first game of StarGruntz.
Close up of the First Squad (see below, obviously laying down covering fire):
- 4 x StarGruntz
- 1 x Missile Man
- 1 x Laz Man (LMG equivalent)
Close up of the Third Squad (see below, on "point"):
Seen from the perspective of the rear "Command Position" (see below):
Overall I am quite please with how they have come out :)
Note to self: I still have another fifteen figures to finish off (in the same painting style methinks), but the above force is supposed to be dropped from a heavy transport (photo to follow in another post) and is "all" that is needed for my first game of StarGruntz.
Labels:
15mm,
15mm Science Fiction,
Fun,
Ground Zero Games,
GZG,
sci-fi,
science fiction,
Star Gruntz,
wargame campaign,
Yaeter
Sunday, 3 December 2017
Sci-Fi Project: The Yaeter (Part 3)
After the Airfix While Satin highlight I thought the (newly painted) Yeater were looking too parade ground shiny so I decided to give them a slight Yellow Sepia Vallejo Wash around the crevices and recesses. This meant a slight touch up of the Airfix Satin White was required, but IMHO was well worth it (see below):
The yellowy look gives the 'grime' effect I am looking for. Next up I will have to go back and do a bit of sand terrain basing before going back to do the "other twenty" before I start thinking of Xmas present additions to my forces from GZG (see below, nearly ready for the tabletop):
As I was painting the small GZG (New Israeli) Yaeter I couldn't help dabble with this 54mm Star Wars figure from my youngest sons collection. The colour schemes are very compatible and you can see where my inspiration was coming from. He is only party done. The top half is benefiting from the shiny Airfix Satin White. The rear has lots of kit details I may have to "just make up" (after all it is just Sci-Fi) or scan some Star Wars images (see below, may need to experiment with some washes and Humbrol weathering dust I pick up a while back but have not yest used):
One disturbing comment from my youngest son was that he preferred the smaller toys. I will have to watch out here as they may go AWOL!
The yellowy look gives the 'grime' effect I am looking for. Next up I will have to go back and do a bit of sand terrain basing before going back to do the "other twenty" before I start thinking of Xmas present additions to my forces from GZG (see below, nearly ready for the tabletop):
As I was painting the small GZG (New Israeli) Yaeter I couldn't help dabble with this 54mm Star Wars figure from my youngest sons collection. The colour schemes are very compatible and you can see where my inspiration was coming from. He is only party done. The top half is benefiting from the shiny Airfix Satin White. The rear has lots of kit details I may have to "just make up" (after all it is just Sci-Fi) or scan some Star Wars images (see below, may need to experiment with some washes and Humbrol weathering dust I pick up a while back but have not yest used):
One disturbing comment from my youngest son was that he preferred the smaller toys. I will have to watch out here as they may go AWOL!
Saturday, 2 December 2017
Sci-Fi Project: The Yaeter (Part 2)
This is sort of my "Wargaming Advent Calendar" in the run up to Xmas, a post a day. Therefore the next stage of my 15mm Sci-Fi fictional Yaeter race of humanoids (see below, half [20] of my collection of [40] figures are on the Painting Tray) :
Nearest to the camera shows a "completed" Yaeter Trooper, behind him comes a field of WIP. After the primer undercoat and wash, Vallejo Game Stone Grey was applied (in a gappy crevice/recess leaving fashion) then followed by a Vallejo Game Dead While highlight. A mixture of Vallejo Game Gun Metal and Anita's Acrylics Metallic Black (2:3 ratio) was applied to anything that looked like part of a gun or helmet visor [just to get it "dark shiny"]. This was then dampened with a Vallejo Sepia (certainly it was brown) Wash to dull things down and emphasise the shadows again.
They are mow waiting to dry overnight and for the Airfix Acrylic Satin White to be applied to (sparingly) raise a shiny white highlight and also lightly highlight weapons with Vallejo Game Gun Metal. Next comes the basing .. watch this space!
Psst. They may even be the forces I even use for some fun with the Portable Wargame concept from Rob Cordery's fertile mind!
Nearest to the camera shows a "completed" Yaeter Trooper, behind him comes a field of WIP. After the primer undercoat and wash, Vallejo Game Stone Grey was applied (in a gappy crevice/recess leaving fashion) then followed by a Vallejo Game Dead While highlight. A mixture of Vallejo Game Gun Metal and Anita's Acrylics Metallic Black (2:3 ratio) was applied to anything that looked like part of a gun or helmet visor [just to get it "dark shiny"]. This was then dampened with a Vallejo Sepia (certainly it was brown) Wash to dull things down and emphasise the shadows again.
They are mow waiting to dry overnight and for the Airfix Acrylic Satin White to be applied to (sparingly) raise a shiny white highlight and also lightly highlight weapons with Vallejo Game Gun Metal. Next comes the basing .. watch this space!
Psst. They may even be the forces I even use for some fun with the Portable Wargame concept from Rob Cordery's fertile mind!
Friday, 1 December 2017
Sci-Fi Project: The Yaeter (Part 1)
Wargaming Promise #1 to fellow wargamer. I will finish painting the StarGruntz 15mm GZG Sci-Fi kit I first started back in November 2014! Not my longest running wargaming project but embarrassing because of how few figures there actually are and how small and easy to paint they are (40 in total plus some odds and sods "random Sci-Fi" stuff I found lying around). The first batch of twenty troopers are here (see below, early days as the first primer coat, wash, grey shade has been put on, more white, wash and satin white to follow):
Half my "platoon". Two squads of ten men (humanoids) each, a manoeuvre team of a NCO plus fire light "laser shooters", then a commanding officer ("Lewt") with supporting heavy (heavier) section. The heavier section deploys a two man(? .. well humanoid) "missile" (anti-armour [AT] or anti-air [AA]) team with shooter and lazer spotter/sniper and two heavier "LAZ guns" with a bit more kick to them. The other twenty troops replicate (as in the same figures of) the above. I think the overall force needs a Platoon Command HQ and a Heavy Supports Section, but I have not decided "what form" that should take.
Even though I put up an initial form of resistance I am coming round to an Order of Battle that is looking more and more like a Chain of Command WWII squad/platoon organisation. Hmm, I feel that I may need to shake that up a bit by putting some funky AI mechanised micro-armour and special automated gun pods, or augmented human robotic helpers in the mix. This means mixing up the Ground Zero Games ranges which I think is a good thing in itself. Perhaps even some "civs" be it scientists or technicians or maybe even the odd crazy couple of mercenaries/scouts.
Half my "platoon". Two squads of ten men (humanoids) each, a manoeuvre team of a NCO plus fire light "laser shooters", then a commanding officer ("Lewt") with supporting heavy (heavier) section. The heavier section deploys a two man(? .. well humanoid) "missile" (anti-armour [AT] or anti-air [AA]) team with shooter and lazer spotter/sniper and two heavier "LAZ guns" with a bit more kick to them. The other twenty troops replicate (as in the same figures of) the above. I think the overall force needs a Platoon Command HQ and a Heavy Supports Section, but I have not decided "what form" that should take.
Even though I put up an initial form of resistance I am coming round to an Order of Battle that is looking more and more like a Chain of Command WWII squad/platoon organisation. Hmm, I feel that I may need to shake that up a bit by putting some funky AI mechanised micro-armour and special automated gun pods, or augmented human robotic helpers in the mix. This means mixing up the Ground Zero Games ranges which I think is a good thing in itself. Perhaps even some "civs" be it scientists or technicians or maybe even the odd crazy couple of mercenaries/scouts.
Thursday, 17 December 2015
Napoleonic Project: The Peninsular War
"Reading the war":
Following on from reading Simon Scarrow's classic "set of four" Welloington/Napoleon historical fiction based on fact books I have been seduced by the charms and intrigues of the Napoleonic War period, in particular the Peninsular Campaign aka the Spanish Ulcer, which was the start of the unravelling of the Napoleonic Empire (see below):
The interest is the beguiling way the Peninsular War started off so innocuously small but ended up with incredibly big battles of huge consequences for all of Europe, also because it seems so "peculiarly British in character" but mainly because the outcome of the campaign hung on a knife edge and could so easily have swung either way so many times. Wellington risked ruin if he lost but a single battle.
The influence of Wellington or conversely the lack of Napoleon's influence seems most acute. My reading continues apace, but I have decided to test my colour palate and painting skills on some Victrix 28mm British fellows. The aim is to have at least enough for a Sharp Practice scenario or two (which means I best bother to get the rules in the first place) before deciding as to whether or not I should go hardcore and get a 15mm British, Portuguese and Spanish army. As a quick start I have some 2mm "Napoleonic Blocks" (from "Irregular Miniatures") that could be fast-tracked into use.
A project well worthy of time spent on it in 2016 ;)
The influence of Wellington or conversely the lack of Napoleon's influence seems most acute. My reading continues apace, but I have decided to test my colour palate and painting skills on some Victrix 28mm British fellows. The aim is to have at least enough for a Sharp Practice scenario or two (which means I best bother to get the rules in the first place) before deciding as to whether or not I should go hardcore and get a 15mm British, Portuguese and Spanish army. As a quick start I have some 2mm "Napoleonic Blocks" (from "Irregular Miniatures") that could be fast-tracked into use.
A project well worthy of time spent on it in 2016 ;)
Sunday, 15 November 2015
Normandy Mini-Campaign (Operation Martlet Part 4): Chain of Command
Down by his prise panzer (alas "Panzer Pete was no more) the German Commander knew he had to pull something out of the bag. He had but one trick left in the bag his 81mm mortar battery. He needed it to come in quickly and so rather than chancing losing the initiative he brought his barrage without a spotting round. There was a deafening roar of cannon fire and a whoosh of splintering hard rain ... somewhere far, far off table. As per the "wants of the game" his command dice meant hat he kept going and got a flip-flop so could have another go. To the despair of the British Commander (me) and the utter delight of the German Commander (Mr K.) the got it picture perfect. I had concentrated too much into too little a space and hung aroung too long. A cardinal sin against a veteran player (see below, Mr.K is seen rushing in with his tape measure in ungentlemanly haste):
Innocuously looking but it is covering my whole platoon (see below):
Not so innocuous now as the "shock" and "kill" markers mounts up (see below):
There was nothing to do but pull back. I had not enough Chain of Command points to influence the turn and the German Commander (Mr K.) had accumulated more 5's so could counter any end of turn gambit I could play. All I could do was hope for an absurd triple or quadruple roll of 6's to hit the 'strange but true' event table. That wasn't going to happen. In retrospect I endured two rounds (I should have bugged out after one in hindsight) as I took a massive thirteen casualties, four the first turn and a massive nine the next. Too much, even if I get some converted to wounded to return to action later in the campaign (see below):
My Nemesis (see above and try and spot him), was a German Artillery FOO with Martian style telescope, hidden in the "White Barn's" roof. My tank on table was the only thing that could fire on him but needed infantry and an NCO nearby to point out hidden enemy infantry targets. Hence I had to "bug".
Despite this drubbing I am eagerly awaiting the next crack at the "Martlet Campaign" to be continued over teh sam egroung (with the new addition of a wrecked German tank as extra German cover..tune in next time for "Go again Sir?" or more sinisterly "Anymore casualties like that Sir and we will have to 'frag you' mate!"
Innocuously looking but it is covering my whole platoon (see below):
Not so innocuous now as the "shock" and "kill" markers mounts up (see below):
There was nothing to do but pull back. I had not enough Chain of Command points to influence the turn and the German Commander (Mr K.) had accumulated more 5's so could counter any end of turn gambit I could play. All I could do was hope for an absurd triple or quadruple roll of 6's to hit the 'strange but true' event table. That wasn't going to happen. In retrospect I endured two rounds (I should have bugged out after one in hindsight) as I took a massive thirteen casualties, four the first turn and a massive nine the next. Too much, even if I get some converted to wounded to return to action later in the campaign (see below):
My Nemesis (see above and try and spot him), was a German Artillery FOO with Martian style telescope, hidden in the "White Barn's" roof. My tank on table was the only thing that could fire on him but needed infantry and an NCO nearby to point out hidden enemy infantry targets. Hence I had to "bug".
Despite this drubbing I am eagerly awaiting the next crack at the "Martlet Campaign" to be continued over teh sam egroung (with the new addition of a wrecked German tank as extra German cover..tune in next time for "Go again Sir?" or more sinisterly "Anymore casualties like that Sir and we will have to 'frag you' mate!"
Labels:
1/72,
1944,
20mm,
British,
British Infantry,
Campaign,
Chain of Command,
German,
German Infantry,
Normandy,
Normandy 1944,
Operation Martlet,
Wargame,
wargame campaign,
WW2,
WWII
Saturday, 14 November 2015
Normandy Mini-Campaign (Operation Martlet Part 3): Chain of Command
To my horror (as the British Commanding Officer: First Lt Spencer) "Panzer Pete" stirred into action. I was also not chuffed to know I was facing the 12th SS Panzer Division. Things were looking "slightly sticky" as the long barrelled 75mm gun barked out some HE at the occupants of "Grey House" (see below):
Kaboom. The Bren team was a team member down. With no PIAT in play I was in no possition to retaliate, I would have to just sit there and take it like KGL at Waterloo (but hang on that was a different strong point). Meanwhile "Panzer Pete" was grinning like a madman and ramming another of HE into the breach for his next go (see below):
Then, down the end of the road came a most pleasant sight to the beleaguered Tommies, Royal Engineer XXX Churchill Spigot armed tank. One of Hobart's funnies still finding gainful employment off the landing beaches. Despite its unassuming appearance and aging paint job [circa the last century ... at a guess 1995 or thereabouts] it still packed a "Chain of Command" punch throwing a dustbin sized charge of HE about (See below)
Even better "Panzer Pete" completely unaware of its existence as he had lined me up with a perfect profile shot (see below):
The small black dot got larger and larger and larger. The Panzer crew stood transfixed in horror as the equivalent of a Barnes Wallis "bouncing bomb" piled into their venerable Panzer IV framework, which despite various upgrades, was no match to something that was the equivalent of naval gunfire in its devastation. The result was inevitable as it was spectacular (see below):
With a sight of relief the British Commander (me) sat back relieved, the German aghast (Mr. K). However the cunning German had another ace up his sleeve.
Next: Hard German 81mm Rain Falls
[Addendum: "Chain of Command" rules review and clarification. After the battle so to speak, when the clamour of the dice and the sweat and perspiration subsides (something that fills every game of Chain of Command and is associated with the indecision of decision) comes the realisation that we must have done something wrong. The Churchill AVRE seems something of a superweapon - only two less AT (10d6 v 12d6) dice than a 17pdr armed Firefly and an incredible 16 (1d6) HE factor. It can hit anything on the table and reload as per a normal tank. Or can it? I had asked in my pre-game support assignment because I knew I had to kill a Panzer IV. So it was a choice of a Sherman and Sherman Firefly combination or a Churchill AVRE and some mortar supports (2" and 3" battery). The latter gave me more AI punch too so that is why I opted for it. But no, the Spigot is externally mounted so reloading is a pain in the bum, it can only be done once per TURN as opposed to activation and its range is limited to 30" tabletop, one of the few range limitations in the charts. So in short an "impossible kill" for the Churchill. Musing afterwards we reinstated the kill (the overall effect did not change the outcome of the game for the Brits, deciding had I know the rules the Sherman/Firefly combination would have been used. Instead of being brewed by a lumbering Royal Engineer's "Funny" the Royal Armoured XXX had chalked up their first Panzer IV kill)]
Kaboom. The Bren team was a team member down. With no PIAT in play I was in no possition to retaliate, I would have to just sit there and take it like KGL at Waterloo (but hang on that was a different strong point). Meanwhile "Panzer Pete" was grinning like a madman and ramming another of HE into the breach for his next go (see below):
Then, down the end of the road came a most pleasant sight to the beleaguered Tommies, Royal Engineer XXX Churchill Spigot armed tank. One of Hobart's funnies still finding gainful employment off the landing beaches. Despite its unassuming appearance and aging paint job [circa the last century ... at a guess 1995 or thereabouts] it still packed a "Chain of Command" punch throwing a dustbin sized charge of HE about (See below)
Even better "Panzer Pete" completely unaware of its existence as he had lined me up with a perfect profile shot (see below):
The small black dot got larger and larger and larger. The Panzer crew stood transfixed in horror as the equivalent of a Barnes Wallis "bouncing bomb" piled into their venerable Panzer IV framework, which despite various upgrades, was no match to something that was the equivalent of naval gunfire in its devastation. The result was inevitable as it was spectacular (see below):
With a sight of relief the British Commander (me) sat back relieved, the German aghast (Mr. K). However the cunning German had another ace up his sleeve.
Next: Hard German 81mm Rain Falls
[Addendum: "Chain of Command" rules review and clarification. After the battle so to speak, when the clamour of the dice and the sweat and perspiration subsides (something that fills every game of Chain of Command and is associated with the indecision of decision) comes the realisation that we must have done something wrong. The Churchill AVRE seems something of a superweapon - only two less AT (10d6 v 12d6) dice than a 17pdr armed Firefly and an incredible 16 (1d6) HE factor. It can hit anything on the table and reload as per a normal tank. Or can it? I had asked in my pre-game support assignment because I knew I had to kill a Panzer IV. So it was a choice of a Sherman and Sherman Firefly combination or a Churchill AVRE and some mortar supports (2" and 3" battery). The latter gave me more AI punch too so that is why I opted for it. But no, the Spigot is externally mounted so reloading is a pain in the bum, it can only be done once per TURN as opposed to activation and its range is limited to 30" tabletop, one of the few range limitations in the charts. So in short an "impossible kill" for the Churchill. Musing afterwards we reinstated the kill (the overall effect did not change the outcome of the game for the Brits, deciding had I know the rules the Sherman/Firefly combination would have been used. Instead of being brewed by a lumbering Royal Engineer's "Funny" the Royal Armoured XXX had chalked up their first Panzer IV kill)]
Labels:
1/72,
1944,
20mm,
British,
British Infantry,
Campaign,
Chain of Command,
German,
German Infantry,
Normandy,
Normandy 1944,
Operation Martlet,
Wargame,
wargame campaign,
WW2,
WWII
Thursday, 12 November 2015
Normandy Mini-Campaign (Operation Martlet Part 2): Chain of Command
Despite the disadvantage of the British 25 pounders hammering the French farmland, the Germans were directed to the frontline by a [suport purchased] -Adjudent. That was a well spent support point as it allowed three M42 teams, an artillery observer and a Medic to get quickly in place. My newly painted acquisitions were soon facing me across the table (see below):
Not only that but "Panzer Pete" turned up in the form of a Panzer IV. This is an old original ESCI kit given to me (unmade) several years ago by Mr K. himself. Now he was getting to use it against me! It was as if he knew it'd destiny and it was all part of a cunning plan. I am slightly ashamed of it as it is just out of the "primer" stage, with a black wash looking very grimy. I had planned to do it in a "three tone cam" but it will do for now (see below):
"First Blood" goes to the Brits as a SS MG42 gunner team member gets caught by my sustained Bren team fire from my mini-Hougomont in "Grey House". As these German MG teams were seriously under strength I saw (or rather got fixated by) the opportunity to reduce its effectiveness and score a 'quick win' (see below):
Fearing the 'open fields of death' to the left and again wanting to eliminate the damaged MG42 team I deployed my whole platoon along a strong hedge line. Dangerous as it was putting all my eggs in one basket, especially as there was a (grimy) Panzer IVH on the loose. Mr K. also saw the opportunity as denoted by the mortar target spot [aka white circle] placed close to them (see below):
Next: "The Risks You Take" and "The Proce You Pay"
Not only that but "Panzer Pete" turned up in the form of a Panzer IV. This is an old original ESCI kit given to me (unmade) several years ago by Mr K. himself. Now he was getting to use it against me! It was as if he knew it'd destiny and it was all part of a cunning plan. I am slightly ashamed of it as it is just out of the "primer" stage, with a black wash looking very grimy. I had planned to do it in a "three tone cam" but it will do for now (see below):
"First Blood" goes to the Brits as a SS MG42 gunner team member gets caught by my sustained Bren team fire from my mini-Hougomont in "Grey House". As these German MG teams were seriously under strength I saw (or rather got fixated by) the opportunity to reduce its effectiveness and score a 'quick win' (see below):
Fearing the 'open fields of death' to the left and again wanting to eliminate the damaged MG42 team I deployed my whole platoon along a strong hedge line. Dangerous as it was putting all my eggs in one basket, especially as there was a (grimy) Panzer IVH on the loose. Mr K. also saw the opportunity as denoted by the mortar target spot [aka white circle] placed close to them (see below):
Next: "The Risks You Take" and "The Proce You Pay"
Labels:
1/72,
1944,
20mm,
British,
British Infantry,
Campaign,
Chain of Command,
German,
German Infantry,
Normandy,
Normandy 1944,
Operation Martlet,
Wargame,
wargame campaign,
WW2,
WWII
Wednesday, 11 November 2015
Normandy Mini-Campaign (Operation Martlet Part 1): Chain of Command
With my 20mm German Panzer Grenadier figures now painted and burning hot in my hand, it was time to get them "on table" ASAP and at the same time, rekindle my love affair with the Chain of Command skirmish rule-set. The scenario was a Normandy 1944 infantry probe towards Caen, called Operation Martlet. Before you could say "Jack Robinson Jam" I was in amongst it in the "patrol phase" with markers pushing forwards over what I considered very "open" aka dangerous) ground. I opted to go "Tommy" so my newly painted figures could shoot at me. The alternative was to play SS which left a tangled knot in the consciousness of my stomach. Silly really, but as I had played British before so I should be better able to pick things up from where I left off. I was against a very experienced foe, Mr K, the instigator of the Chain of Command's popularity in my local club. Anyway I rolled well and was pleased that got up table pretty fast. I opted to move three patrol markers instead of the possible four in order to move faster by shortening "the chain" [markers have to maintain a contiguous string, with no marker more than 12" from another ] (see below):
Fritz was, through a 'scenario specific rule' was waiting in stasis on the road, straining to be let free to pin my markets. After my 'five free moves' (1d6 worth according to the scenario) Mr K. was free and set about pinning me in place, but I had shifted over half-way up the right hand side although a measly third up the left (see below, Fritz's patrol marker line):
I converted to 'jump off markers' and was reasonably happy to get near some 'hard cover' to my right but was dismayed by the openness of the left that offered great scope for the devastating MG42 fire (see below, Q: Was I creating a rod for my own back thinking in such terms? Am I giving the German player Mr K, an advantage with the equivalent of a "psyche" Tommy own goal? ):
The SS were nicely placed in hard cover, but that was to be expected from the set-up. It was going to be no meant feat of arms to plod through the "open" if the Germans got defensively set, as expected (see below):
After all the paper chasing in the Payrpl Phase it was a relief to get "Toys on the table!" Huzzah! Gaining the initiative an Infantry Squad, [Support] 2" Mortar Team and a Senior Officer occupy the "Grey House" on the right. It offers a good field of fire the left but is "blind" looking up the table, so not as good as I wanted. Still, I was lucky, as there was another 'scenario specific rule' regarding the Scotch Mist and a chance for troops to get lost and NOT even finding the battlefield. My turn over I settled back to hear the comforting sound of a British Artillery barrage landing behind German lines, another [beneficial for the Brits] 'scenario specific rule' (see below, my mini Hougoumont):
Next: The German SS Panzer Grenadiers deploy
Labels:
1/72,
1944,
20mm,
British,
British Infantry,
Chain of Command,
German,
German Infantry,
Normandy,
Normandy 1944,
Operation Martlet,
Wargame,
wargame campaign,
WW2,
WWII
Subscribe to:
Posts (Atom)