A new "Pup" (assembled) for Xmas but not one to get the wife excited about ;) Something to help the RFC fight off the dreaded Imperial German Air Service Albatross II's, the Sopwith Pup fighter (see below): oot
Even better the Pup comes with a few RFC friends (another Pup, a Sopwith One-and-a-Half Strutter and a DH4) but some dastardly enemies (an Albatross II and a Rumpler CIV) to boot. Something to keep me busy on the 'slow but carefully does it' assembly line. This "kind-of" covers the early to mid-war section of WWI .. with the possible of the German ground straffing Roland and another Spad VII.
Chocks away!
The ongoing adventures of a boy who never grew out of making and playing with plastic model kits (and even some metal ones too). Also a wargamer in search of the perfect set of wargaming rules for WWII Land and 20th Century Naval campaigns.
Wednesday, 26 December 2018
Tuesday, 25 December 2018
Friday, 21 December 2018
"E-Boat bearing Green 20!"
The sharped eye lookout spotted a sinister shape lurking in the (displaying no wake as I had forgot to put one in the picture) and cried out in alarm (see below, my first factory fresh German S-Boat):
Just the basic colours (not even a highlight). I will slip a coat of matte varnish on her ready for the first Cruel Seas scenario. All I have to do is paint up a couple of Vospers! I started with my Airfix Acrylic primer followed by a Vallejo Black Wash.
Painting Notes:
I had a hard time acquiring the correct '50 shades of grey' as per the Cruel Seas painting guides but I did get the legendary Vallejo Model Colour London Grey to which I painted the S-Boat deck. The light (Vallejo Sky Grey) grey was subbed by Vallejo by the Vallejo Game Colour Stonewall Grey. Oak was in turned replaced by Beasty Brown (decking) and Panzer Periscope was replaced by Imperial Blue (windows). That just left gun metal for the torpedoes, with the top quarter of the fish (or "eels") painted black. I did not bother with the fleck of gold at the rear of the torpedo as suggested in the painting guide. Still to do is a little "grey highlighting" but I can get away without this in the first instance.
Just the basic colours (not even a highlight). I will slip a coat of matte varnish on her ready for the first Cruel Seas scenario. All I have to do is paint up a couple of Vospers! I started with my Airfix Acrylic primer followed by a Vallejo Black Wash.
Painting Notes:
I had a hard time acquiring the correct '50 shades of grey' as per the Cruel Seas painting guides but I did get the legendary Vallejo Model Colour London Grey to which I painted the S-Boat deck. The light (Vallejo Sky Grey) grey was subbed by Vallejo by the Vallejo Game Colour Stonewall Grey. Oak was in turned replaced by Beasty Brown (decking) and Panzer Periscope was replaced by Imperial Blue (windows). That just left gun metal for the torpedoes, with the top quarter of the fish (or "eels") painted black. I did not bother with the fleck of gold at the rear of the torpedo as suggested in the painting guide. Still to do is a little "grey highlighting" but I can get away without this in the first instance.
Labels:
1/200,
airfix paints,
Cruel Seas,
E-Boat,
KM,
Kriegs Marine,
Modelling,
Naval,
Painting Description,
Painting Tray,
Primer,
S-Boat,
Vallejo,
Vallejo Paints,
Vallejo Wash,
WW2,
WWII
Thursday, 20 December 2018
School Tank Project - The Tiger Tamer .. The Sherman Firefly
So it started, a decree from school and a small child wanting to make a WWII tank. I told the lad about the fabled "Tiger Tamer" that was the Allied response to the deadly German Tiger and Panther tanks. The journey started with a tank that would not survive the trip to the primary school (see below, the 1/32 inspiration [from a company called "21st Century Toys" I think] and some seemingly random bits of cardboard and balsa - can you see what it is yet):
Taking that distinctive boxy Sherman shape (see below, courtesy of an ingenious "flat" stapler gun - my universe has completely changed):
Classic PVA mixed with "Pound Shop" or "Home Bargains" acrylic for quite an authentic (IMHO) British Army Bronze Green (see below - this was quite a messy part of the process, also track and turret parts are WIP):
Next was a clever (if I do say so myself) use of coffee stirrings that I "always" collect when I can (see below, snipped into pieces and around a cardboard and balsa frame - two of which have to be made of course - this took some effort sticking them on with the aid of a "glue gun"):
First production "mock-up"(see below, a HB pencil has been brought in after much debate to be the "gun" - perhaps a slightly Super Sherman 105mm rather than a 76mm Firefly 17 pounder, but what the heck I am sure the kids will love it):
Looking good (see below, please note the "gun mantle"):
Painting time - Green complete (see below, "looking good?"):
Final painting job, the tracks, black courtesy of "The Works" art section and final "glue gun" assembly (see below, note - I had quite a hard job steering my sons painting away from the "green" sides):
Bring on that "Tiger" (see below, close infantry armour cooperation with Airfix British Infantry - also note the line drawn wheels and suspension):
Who knows Tim does a WWII lawn battle beckon for it in 2019 or do you require a mass production line to churn out twenty or so for a RTR?
Taking that distinctive boxy Sherman shape (see below, courtesy of an ingenious "flat" stapler gun - my universe has completely changed):
Classic PVA mixed with "Pound Shop" or "Home Bargains" acrylic for quite an authentic (IMHO) British Army Bronze Green (see below - this was quite a messy part of the process, also track and turret parts are WIP):
Next was a clever (if I do say so myself) use of coffee stirrings that I "always" collect when I can (see below, snipped into pieces and around a cardboard and balsa frame - two of which have to be made of course - this took some effort sticking them on with the aid of a "glue gun"):
First production "mock-up"(see below, a HB pencil has been brought in after much debate to be the "gun" - perhaps a slightly Super Sherman 105mm rather than a 76mm Firefly 17 pounder, but what the heck I am sure the kids will love it):
Looking good (see below, please note the "gun mantle"):
Painting time - Green complete (see below, "looking good?"):
Final painting job, the tracks, black courtesy of "The Works" art section and final "glue gun" assembly (see below, note - I had quite a hard job steering my sons painting away from the "green" sides):
Bring on that "Tiger" (see below, close infantry armour cooperation with Airfix British Infantry - also note the line drawn wheels and suspension):
Who knows Tim does a WWII lawn battle beckon for it in 2019 or do you require a mass production line to churn out twenty or so for a RTR?
Labels:
1/32,
21st Century,
family,
Fun,
School Project,
Sherman Firefly,
WW2,
WWII
Wednesday, 19 December 2018
Another Portable Wargame: Eastern Front Scenario - Take III (Part 2)
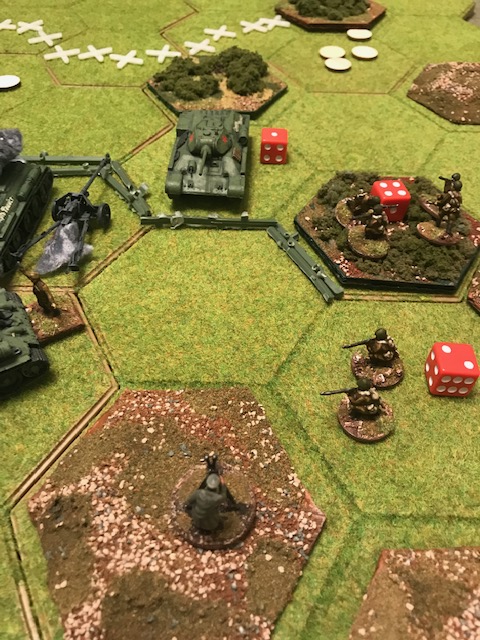
Realising that the German artillery position is the most dangerous position the T-34s concentrate their attention on it (see below):
Exchanging shots the T-34 take damage but gain the upper hand (see below):
The German front line valiantly tries to hold back yet more T-34s and infantry but cannot help but nervously look over their shoulders (see below):
It is "do-or-die" time for the German gunners (see below):
But the appearance of a third T-34 seals their fate (see below):
The Russian infantry pressure also breaks the German infantry line (see below):
Then the German gunners are gone (see below):
And the position overran (see below):
Morale broken the Germans "drift away" on the breeze, the flotsam and jetsam of the 'lost' battlefield (see below):
The German armour (a trusty PSC Panzer IVH) escapes thanks to its mobility. It has been very ineffectual in its attacks (see below):
The German Commander routs (see below - lucky to be alive):
The last German platoon is surrounded and surrenders (see below):
Quiet a brutal affair, but I did want to see how the "step-loss" rule variant played. I liked it. However the "quick kill" seems much more in the vein of the armour (now you see it now you don't), so I might just mix-and-match them. Something about the gun values may need tweaking too when you get light tanks versus heavies etc. I do like the 'morale collapse' passing the initiative to the attacker (or perhaps non-broken). Onwards to "Developing the Portable Wargame" as I believe Bob addresses some of these very issues ("Pinning": say no more!). Also I think it is time for me to cook up some of my own scenarios.
Exchanging shots the T-34 take damage but gain the upper hand (see below):
The German front line valiantly tries to hold back yet more T-34s and infantry but cannot help but nervously look over their shoulders (see below):
It is "do-or-die" time for the German gunners (see below):
But the appearance of a third T-34 seals their fate (see below):
The Russian infantry pressure also breaks the German infantry line (see below):
Then the German gunners are gone (see below):
And the position overran (see below):
Morale broken the Germans "drift away" on the breeze, the flotsam and jetsam of the 'lost' battlefield (see below):
The German armour (a trusty PSC Panzer IVH) escapes thanks to its mobility. It has been very ineffectual in its attacks (see below):
The German Commander routs (see below - lucky to be alive):
The last German platoon is surrounded and surrenders (see below):
Quiet a brutal affair, but I did want to see how the "step-loss" rule variant played. I liked it. However the "quick kill" seems much more in the vein of the armour (now you see it now you don't), so I might just mix-and-match them. Something about the gun values may need tweaking too when you get light tanks versus heavies etc. I do like the 'morale collapse' passing the initiative to the attacker (or perhaps non-broken). Onwards to "Developing the Portable Wargame" as I believe Bob addresses some of these very issues ("Pinning": say no more!). Also I think it is time for me to cook up some of my own scenarios.
Labels:
1/72,
1/76,
20mm,
Bob Cordery,
German,
panzer IV,
portable wargame,
Russia 1943,
Russian,
T34/76,
Wargame,
WW2,
WWII
Tuesday, 18 December 2018
Another Portable Wargame: Eastern Front Scenario - Take III (Part 1)
Another run out for Bob Cordery's Portable Wargame rules, this time played with the "step-loss" variant (so no quick kills). Dawn breaks to see the German defenders facing a gathering sea of Red Army units ready to "surge" forwards 'en masse' (see below):
The German Armour takes a flanking position to anchor the front (see below):
The Soviet T-34 Phalanx just chooses to roll on through the middle (see below):
Soviet artillery pushes the German PAK crews out of their prepared positions as the T-34s try to grind the Germans out of their defenses (see below):
The German PAK rallies and reoccupies the defenses (see below):
However this precipitates the T-34s to storm the defenses (see below):
The Pak 40 Platoon succumbs to the treads'n'tracks of the metal monster (see below, note the weakened German MG platoon to the right - it has been a tough time in the line):
The German center is wilting and the German armour is engaged in an ineffectual dual on the German left flank. Russian infantry have moved up on the German right flank and it is beginning to look very precarious for the defenders (see below):
The meat-grinder continues with German infantry attacking the central T-34 from a covered ambush position (see below):
The Germans are looking very thread-bare so the attack is desperate measure (see below):
The first German attack id repulsed (see below):
But the second sees the T-34 erupt in a column of smoke and flame (see below):
Meanwhile the relentless Russian attacks have ground down the German infantry destroying a German Infantry Platoon (see below):
A second T-34 launches an overrun attack and cuts behind into the heart of the defense threatening the German Artillery position (see below):
The odds seem stacked against the Germans .. is there any chance of a counter-attack?
The German Armour takes a flanking position to anchor the front (see below):
The Soviet T-34 Phalanx just chooses to roll on through the middle (see below):
Soviet artillery pushes the German PAK crews out of their prepared positions as the T-34s try to grind the Germans out of their defenses (see below):
The German PAK rallies and reoccupies the defenses (see below):
However this precipitates the T-34s to storm the defenses (see below):
The Pak 40 Platoon succumbs to the treads'n'tracks of the metal monster (see below, note the weakened German MG platoon to the right - it has been a tough time in the line):
The German center is wilting and the German armour is engaged in an ineffectual dual on the German left flank. Russian infantry have moved up on the German right flank and it is beginning to look very precarious for the defenders (see below):
The meat-grinder continues with German infantry attacking the central T-34 from a covered ambush position (see below):
The Germans are looking very thread-bare so the attack is desperate measure (see below):
The first German attack id repulsed (see below):
But the second sees the T-34 erupt in a column of smoke and flame (see below):
Meanwhile the relentless Russian attacks have ground down the German infantry destroying a German Infantry Platoon (see below):
A second T-34 launches an overrun attack and cuts behind into the heart of the defense threatening the German Artillery position (see below):
The odds seem stacked against the Germans .. is there any chance of a counter-attack?
Labels:
1/72,
1/76,
20mm,
Bob Cordery,
German,
panzer IV,
portable wargame,
Russia 1943,
Russian,
T34/76,
Wargame,
WW2,
WWII
Saturday, 15 December 2018
Malburian Infantry WIP Update
In the style of the Grand Old Duke of York, he had ten thousand men (see below, I started with a mere eighteen - these have been primed, washed and base-coated their predominant colour):
This means I can start working through the highlighting (see below, the top row is still base painted, but underneath going left to right are progressive elements of highlighting, with a finished one on the end):
A close up of "Finished Fred" (see below, looking perhaps a little cock-eyed but I like his surliness):
One down and seventeen in the regiment/brigade (delete as applicable). Following this six Grenadiers and a dozen Walloon Cavalry, plus as an added bonus Prince Eugene himself (batting for the other side).
This means I can start working through the highlighting (see below, the top row is still base painted, but underneath going left to right are progressive elements of highlighting, with a finished one on the end):
A close up of "Finished Fred" (see below, looking perhaps a little cock-eyed but I like his surliness):
One down and seventeen in the regiment/brigade (delete as applicable). Following this six Grenadiers and a dozen Walloon Cavalry, plus as an added bonus Prince Eugene himself (batting for the other side).
Subscribe to:
Posts (Atom)